Cross Stitch Parking Method for Beginners (Row by Row vs Cross-Country)
The cross stitch parking method for beginners: block and row-by-row parking step by step, parking vs cross-country, and tips for charts with many colors.
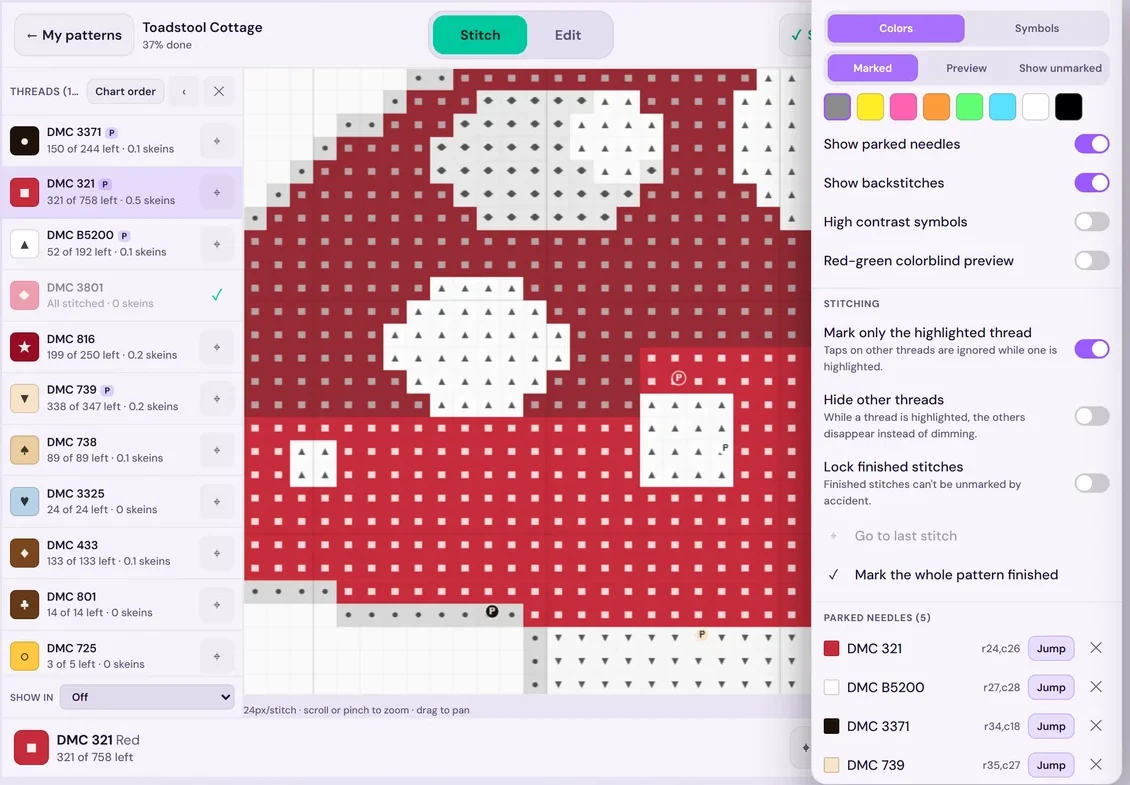
Quick answer: Parking is a way to stitch many colors in one small area at a time. You stitch every color in a block (usually 10 × 10), and instead of ending each thread you bring the needle up at that color's next stitch in the next block and leave it "parked" there. It means far fewer starts and stops and an even finish on busy, full-coverage charts. The hard part is keeping track of a dozen parked threads: in StitchThis you mark where each one is parked, and it saves those markers and syncs them to every device.
If you've ever opened a chart with 60 colors and thousands of scattered single stitches, you know the problem: stitching one color across the whole chart means endless starts and stops, threads carried across the back, and losing track of what's done. Parking solves it. This guide explains what parking is, when it's worth it, the two main ways to do it step by step, how it compares with cross-country and color-by-color stitching, and how to keep a dozen parked needles under control.
What is parking in cross stitch?
Parking means you finish one small area completely, every color in it, before moving on. When a color reaches the edge of the area, you don't end the thread: you bring the needle up at that color's next stitch outside the area and leave it hanging on the front, "parked". When you move to the next area, it's waiting exactly where you need it. You work the chart like a printer, one block or row at a time, and every thread travels only a short distance.
It's worth it on full-coverage charts, charts with scattered single stitches ("confetti", see reading confetti-heavy patterns), charts with 30 or more colors, and pieces where you want a neat back. Skip it on designs with big blocks of one color, small projects, or your very first piece (learn to read a chart first).
Parking is easier on a screen
The stitching is simple. The bookkeeping is what wears people down: where is each needle parked, which blocks are done, which of two near-identical shades is this one? On paper, that means scribbles on the chart. In the StitchThis tracker:
- Mark where each thread is parked and it shows as a marker on the chart, with a list of all of them and a Jump button. A marker clears itself when you stitch its square.
- Finished blocks are marked with one long-press, and finished stitches are tinted, so you always see where you are.
- Highlight one thread and every other thread grays out, so each square of it in the block stands out.
- Your parks sync with your progress, so they're waiting on your tablet, phone or laptop, even after a month away.
More on each of these further down, after the step-by-step.
What you need
- Needles: one is enough to start. You can park the floss unthreaded and rethread one needle as you go, or leave a needle on each parked thread so it's ready to pick up. Many stitchers end up with 10 to 20 needles on a busy chart; inexpensive packs are fine, and a magnet or needle minder keeps them handy.
- A way to track your place: a working copy of the chart you can mark, or a tracker like StitchThis that keeps your parked needles and finished blocks for you.
- Thread cut a little shorter than usual. About 15 to 18 inches (38 to 45 cm) tangles less when several threads hang from the front.
- A frame or scroll frame that keeps the fabric taut. Parked threads are easier to manage when the fabric doesn't flop.
- Optional: a thread organizer card or floss drops labeled with numbers, so you can tell similar shades apart.
Block parking, step by step (the classic method)
Block parking works in 10 × 10 squares, the ones marked by the bold lines on most charts.
- Pick your starting block. Most stitchers start top left and work across, then down (or start top right if they're left-handed).
- Stitch one color in the block. Take a color in the block and stitch every square of it inside the block.
- Park it. Look at the next block to the right (or below, depending on your direction) and find the first stitch of that color there. Bring the needle up through the hole where you'd normally start that cross, keeping to the stitch direction you always use (for most stitchers, the bottom-left corner), and leave the thread on the front. Parking in the exact starting hole is what keeps your count right when you come back. If the color doesn't appear in the next block, park it at its next appearance further along, or end it. In StitchThis, tap Park and then that square to drop a marker for the thread.
- Repeat for every color in the block. One by one, stitch each color and park it.
- Check the block is complete, then mark it done on your chart (in StitchThis, long-press and choose Mark this 10×10 block).
- Move to the next block. Your parked threads are already sitting at their first stitches. Pick them up one by one, stitch them, and park them again in the block after.
- At the end of a row of blocks, park threads downward into the next row of blocks rather than across.
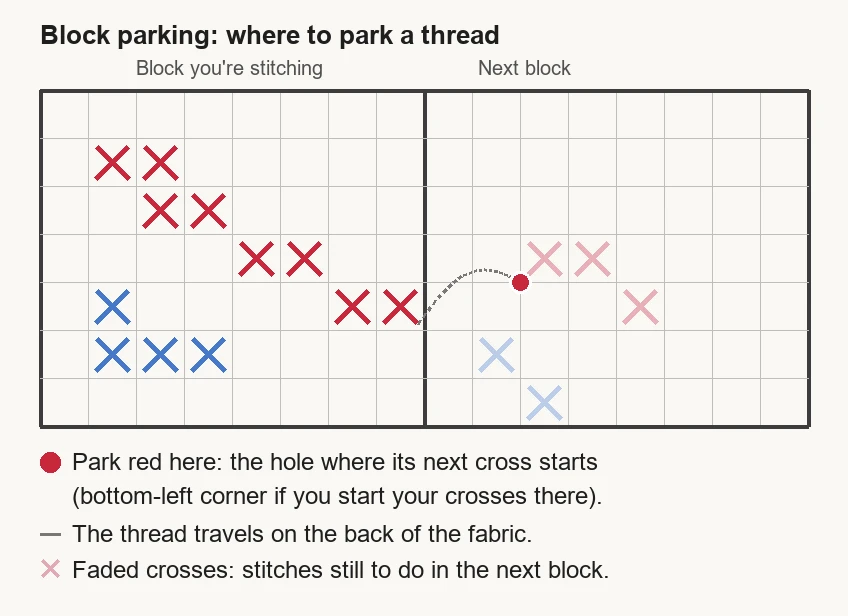
Tip: park "ahead and down". Parking into the block directly below as well as the one to the right means fewer threads need to travel when you wrap to the next row.
Row-by-row parking, step by step
Row-by-row parking works one row of the chart at a time.
- Stitch one row. Work along a single row, color by color, stitching each color's squares in that row.
- Park each color below. When a color is done in the row, find its next stitch in the rows below and park the thread in that cross's starting hole.
- Start the next row. The threads you need are already waiting. Work along the row again, picking each one up as you reach it.
A common variation works a band of several rows (often 10, matching the chart's bold lines) across the page instead of a single row. Wider bands mean fewer stops; single rows mean fewer threads hanging at once. It suits stitchers who like long runs, but a long row or band takes longer to finish than a block, so it's less satisfying in short sessions.
Names vary between groups, so if a pattern or a YouTube tutorial uses a term differently, go by what they describe.
Parking vs cross-country vs color-by-color
| Method | How it works | Best for | Downsides |
|---|---|---|---|
| Extreme cross-country | One color across the whole chart, then the next | Simple designs, big color areas | Long carries, many starts, easy to miss stitches |
| Cross-country | Follow one color through an area, then the next | Medium charts, moderate confetti | More starts and stops on busy areas; some carries |
| Block parking | Every color in a 10 × 10 block, threads parked ahead | Full-coverage, confetti-heavy charts | Many threads to manage; slower at first; possible lines at block edges |
| Row-by-row parking | Every color in one row (or a band of rows), parked below | Full-coverage charts, long sessions | Many threads hanging across the row |
Cross-country and parking aren't opposites, and many stitchers combine them: follow a color through part of an area cross-country style, then park it at its next stitch instead of ending it. Either way, parked threads still travel across the back to their next position, so keep carries short. One thing to watch with strict block parking: stitching every block edge at a different time can leave faint lines where the blocks meet, so some stitchers stagger their block edges or keep a consistent stitch direction across them.
Tips for managing many parked threads
- Keep the front tidy. Gather parked threads above or below the area you're working and clip them out of the way with a hair clip or a small binder clip, or tuck them under a magnet.
- Watch similar shades. Write the thread number on a scrap of masking tape on the needle, or keep a labeled floss card next to your hoop.
- Don't carry threads more than a few stitches on the back. If the next stitch of a color is far away, end the thread and start it fresh when you get there.
- Use "half parking" on very busy charts. Some stitchers work the first leg of each cross in the block for every color, then come back for the second legs, to keep tension even. It's optional.
- Track what's done. Mark each block finished on your working copy, so a parked thread is never left waiting in a block you've already completed.
- Expect slower sessions at first. Parking feels slow for the first few blocks and faster once you're in a rhythm, because there's far less starting, ending and searching. Our guide to how long cross stitch takes shows how much starts and stops add.
- Start a big chart in the middle? Possible, but parking works best moving in one direction. Starting top left (or top right) is simpler.
If big, busy charts have ever made you want to give up, why cross stitch patterns feel miserable explains which chart choices cause it.
The hard parts of parking, solved in StitchThis
Parking itself is simple. What wears people down is the bookkeeping. Here's how StitchThis handles each part of it.
"Where did I park that needle?"
On paper, you scribble marks on the chart and hope you can read them next week. In StitchThis, each parked needle is a marker on the chart itself. Pick a thread and tap Park, long-press a stitch and choose Park here, or double-tap a stitch. Each thread has one parked position, so re-parking just moves it, and a small P in the thread list shows which threads have a needle out. The Parked needles list in the More menu shows every one with its row and column, and Jump takes you straight to it. When you mark the parked stitch as done, its marker clears itself, because the needle just stitched it.
"Which blocks have I finished?"
Long-press a block and choose Mark this 10×10 block, or tap and drag to mark stitches as you go. Finished stitches are tinted, so a glance shows exactly where you are, and the stats show percent done, stitches left per thread, your pace and an estimated finish date.
"I can't tell these two shades apart"
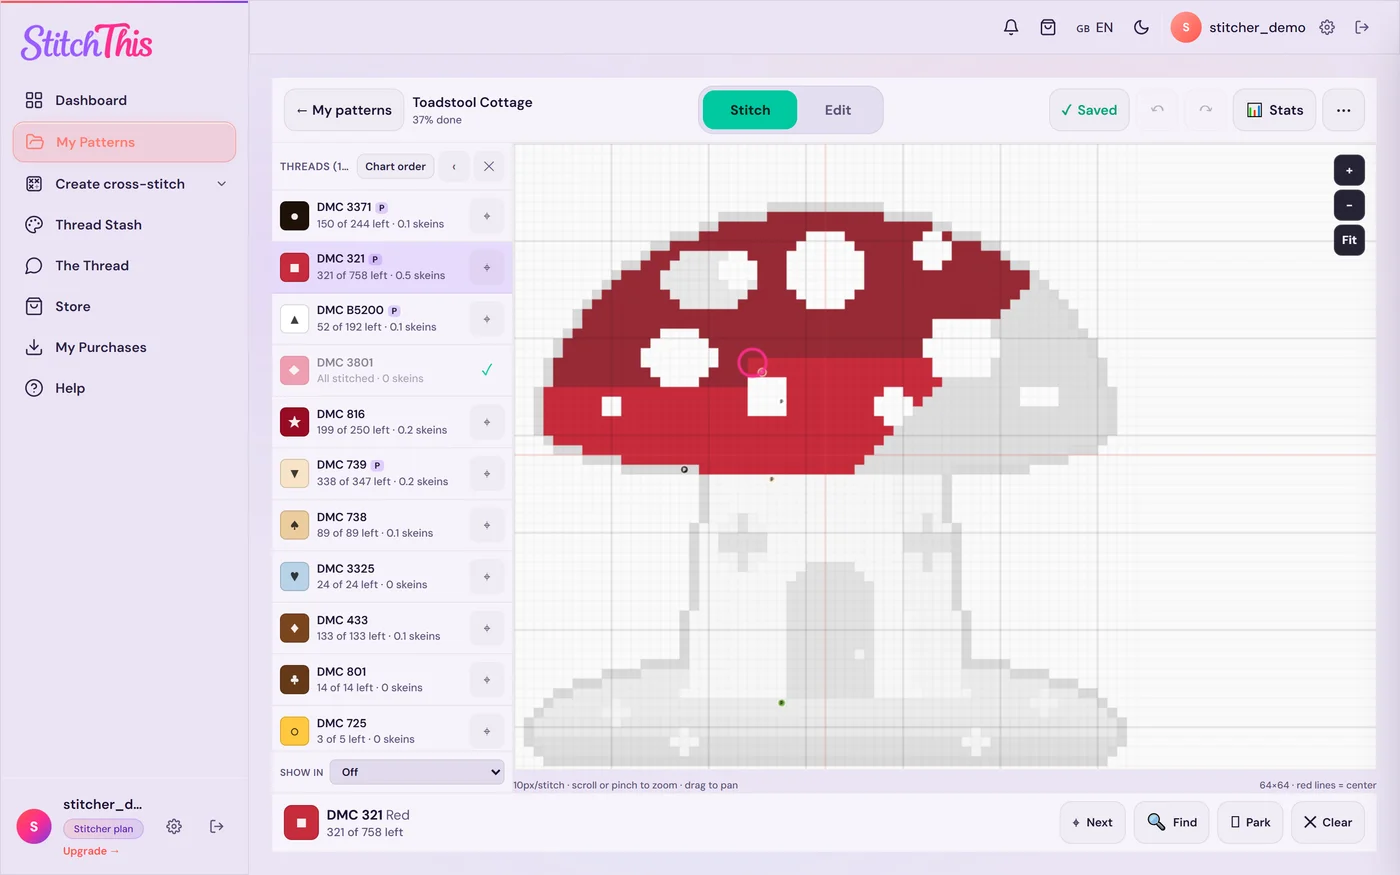
Highlight one thread and every other thread grays out, so every square of it in the block stands out. Limit marking to that thread so a stray tap can't mark the wrong color, and Next jumps to its next unmarked stitch. A red-green colorblind preview and high-contrast symbols help with shades that blur together.
"I put it down for a month"
Parks are saved and synced with your stitches, so they're waiting on your tablet tonight and your phone or laptop next month, and they work offline on patterns you've saved to the device.
"The chart itself is a mess"
Full-coverage charts, especially ones generated by AI, often carry stray single stitches that make parking slower for no visual gain. Edit the chart before you stitch it: Change All merges a near-duplicate shade into its neighbor, and Draw repaints a lone stitch in the color around it.
Needle parking is part of Stitch Tracker ($19.97 a year, renews yearly, cancel anytime and keep every chart) and Maker, and it's included on every pattern you buy from the StitchThis store. Import the full-coverage PDF you've been putting off on the PDF pattern tracker, or try StitchThis free first. Not sure your PDF will import? Which cross stitch PDFs work with tracker apps explains how to check.
Parking and your floss
Parking uses short lengths of many colors at once, so you'll find out fast if a color is running low. Before you start a big chart, check what you own: the free floss stash tracker keeps your threads by brand and number, and you can bring your existing list in from a CSV spreadsheet or by photographing your skeins instead of typing 200 numbers. The floss stash organization guide covers the physical side: bobbins, drops and labeled cards that make it easier to tell 3865 from B5200 under a lamp. For how much fabric and floss a big chart needs, use the cross stitch calculator.
Frequently asked questions
What is the parking method in cross stitch? Stitching every color in a small area (usually a 10 × 10 block) and, instead of ending each thread, bringing it up at its next stitch outside the area and leaving it there for later. It cuts thread ends and traveling threads on busy charts.
Is the parking method good for beginners? Yes, once you can read a chart and count reliably. On a first small project, color-by-color stitching is simpler. Try parking on your first full-coverage or confetti-heavy chart.
What is the difference between parking and cross-country? Cross-country follows one color through an area at a time; parking works every color in a small area and leaves each thread parked at its next stitch. Many stitchers combine the two.
How do you do row-by-row parking? Stitch every color in a band (often 10 rows tall) across the page, parking each color at its first stitch in the band below, then work the next band.
How many needles do I need for parking? As few as one: you can park the floss unthreaded and rethread as you go. Many stitchers prefer a needle on each parked thread, often 10 to 20 on a busy chart, so each one is ready to pick up.
Does parking make the back of my cross stitch neater? Generally, yes: threads travel only short distances, and there are far fewer starts and ends.
Which fabric count is best for parking? Any. Many full-coverage charts are stitched on 16- or 18-count, which makes them smaller but the squares harder to see; Aida 14 vs 16 vs 18 compares them.
Can I park needles in a cross stitch app? Yes. In StitchThis, the Park tool puts a marker on the chart for each parked thread, lists them with a Jump button, clears each one when you stitch it, and saves them with your progress across devices.
Start your first parked block
Pick a busy chart, thread up five or six needles, and stitch one 10 × 10 block with parking tonight. When you're ready to keep the whole thing in one place, StitchThis is the full cross stitch platform: the chart and its parked needles, your progress on every device, your floss stash, your other projects in the project tracker, and patterns to buy or make next, on the iPad or PC. Our guides to tracking cross stitch progress and managing multiple WIPs help with the long haul, the symbols guide helps with the chart, and the iPad cross stitch software roundup covers devices. Want a chart of your own photo to park through? The cross stitch pattern maker makes one.
Heb je al een patroon als PDF?
Upload het naar StitchThis en borduur ervan op je scherm: zoom in op elk deel, markeer steken terwijl je werkt en ga verder waar je gebleven was.
Importeer je PDF gratisGratis abonnement: bewaar 2 geïmporteerde patronen en houd 2 patronen tegelijk bij, zonder tijdslimiet. Geen creditcard nodig.