How to Track Cross-Stitch Progress: Highlighters, Spreadsheets and Apps Compared
How to track cross-stitch progress: highlighter on a working copy, wipe-off markers, spreadsheets with pace and finish-date formulas, and apps that count for you.
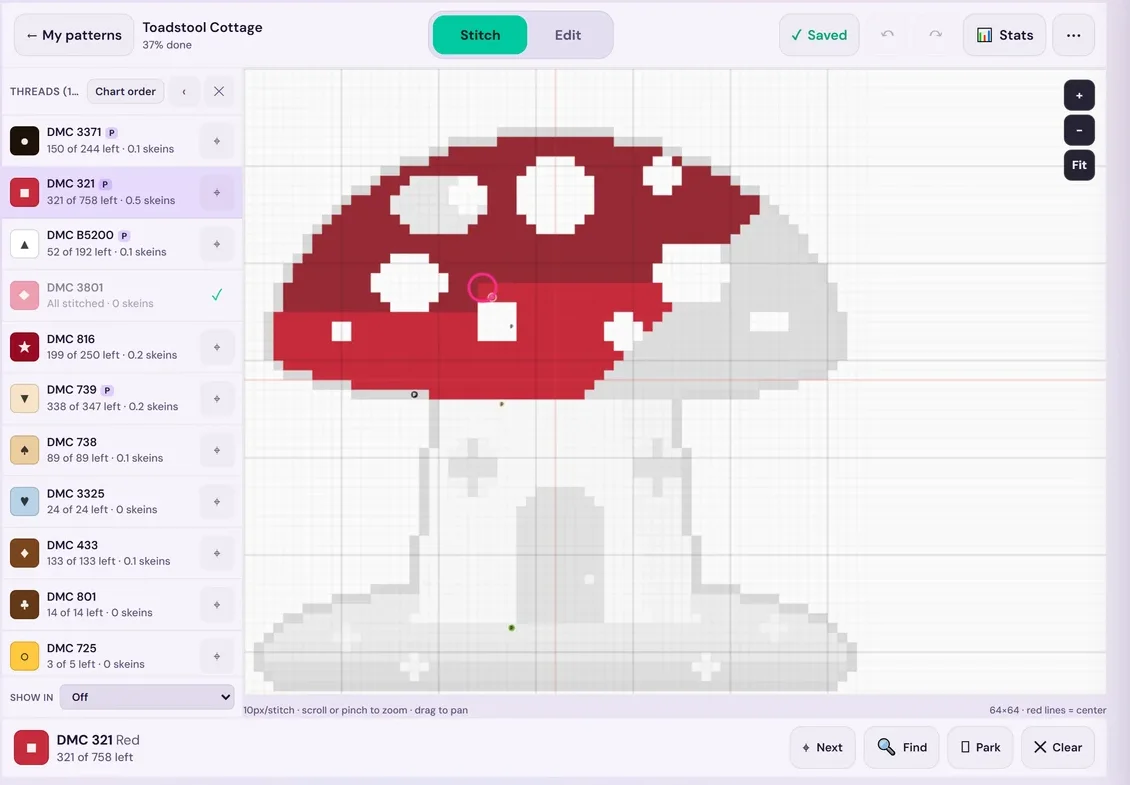
Quick answer: On paper, highlight finished stitches on a working copy of the chart, and keep a small spreadsheet if you want numbers. The easier way is to mark off the chart on a screen: in StitchThis you tap or drag over the stitches you've done, and it keeps your place, your percent done, your pace and your finish date, synced to every device.
Tracking progress sounds like admin, but it solves three real problems: losing your place, losing motivation on a big piece, and not knowing whether a gift will be ready in time. This guide starts with the quickest way, marking off your chart in StitchThis, then covers the paper methods stitchers have used for decades, a progress spreadsheet with the formulas, and which numbers are worth keeping.
Why track your progress at all
- Your place. Knowing exactly which stitches are done, especially in busy areas with many colors, saves recounting and mistakes.
- Motivation. A 30,000-stitch piece feels endless until you see "41% done" and a line going up. It's even better shared: other stitchers cheering on your WIP is what keeps a lot of people going through the middle of a big piece.
- Deadlines. Pace and stitches left tell you when you'll finish, which matters for gifts and stitch-alongs.
- Floss. Knowing how much of each color is left tells you when to buy another skein, before you run out mid-row.
If you're new to reading charts, the beginner's guide section on counting and keeping your place is the foundation for everything below.
How to mark off a cross stitch pattern in StitchThis
StitchThis does the marking, the counting and the math in one place, and it's part of a full cross stitch platform: your charts, your floss stash and your other projects live in the same account. To track a chart:
- Bring the chart in. Import a PDF or OXS chart you own, or open a pattern you made from a photo. You check the imported chart on a review screen before it's saved.
- Mark off what you stitch. Tap a stitch, drag across a row, or long-press and choose Mark this 10×10 block. Finished stitches are tinted, so your place is obvious. On an iPad, Apple Pencil works too.
- Work one color at a time. Highlight a thread and every other thread grays out, so every square of it stands out. Next jumps to its next unmarked stitch.
- Read your numbers. Stats shows percent done, stitches left, total stitching time and stitching days, your pace, a 14-day chart, and an estimated finish date that follows how often you really stitch. Each thread shows how many of its stitches are left.
- Pick it up anywhere. Progress saves as you go and syncs between your phone, tablet and computer, and "Save to this device" keeps a pattern for stitching offline.
- Share it. Post a progress photo in the WIP board of the StitchThis community forum, where other stitchers follow along and cheer you on, and show off the finish in Show and Tell.
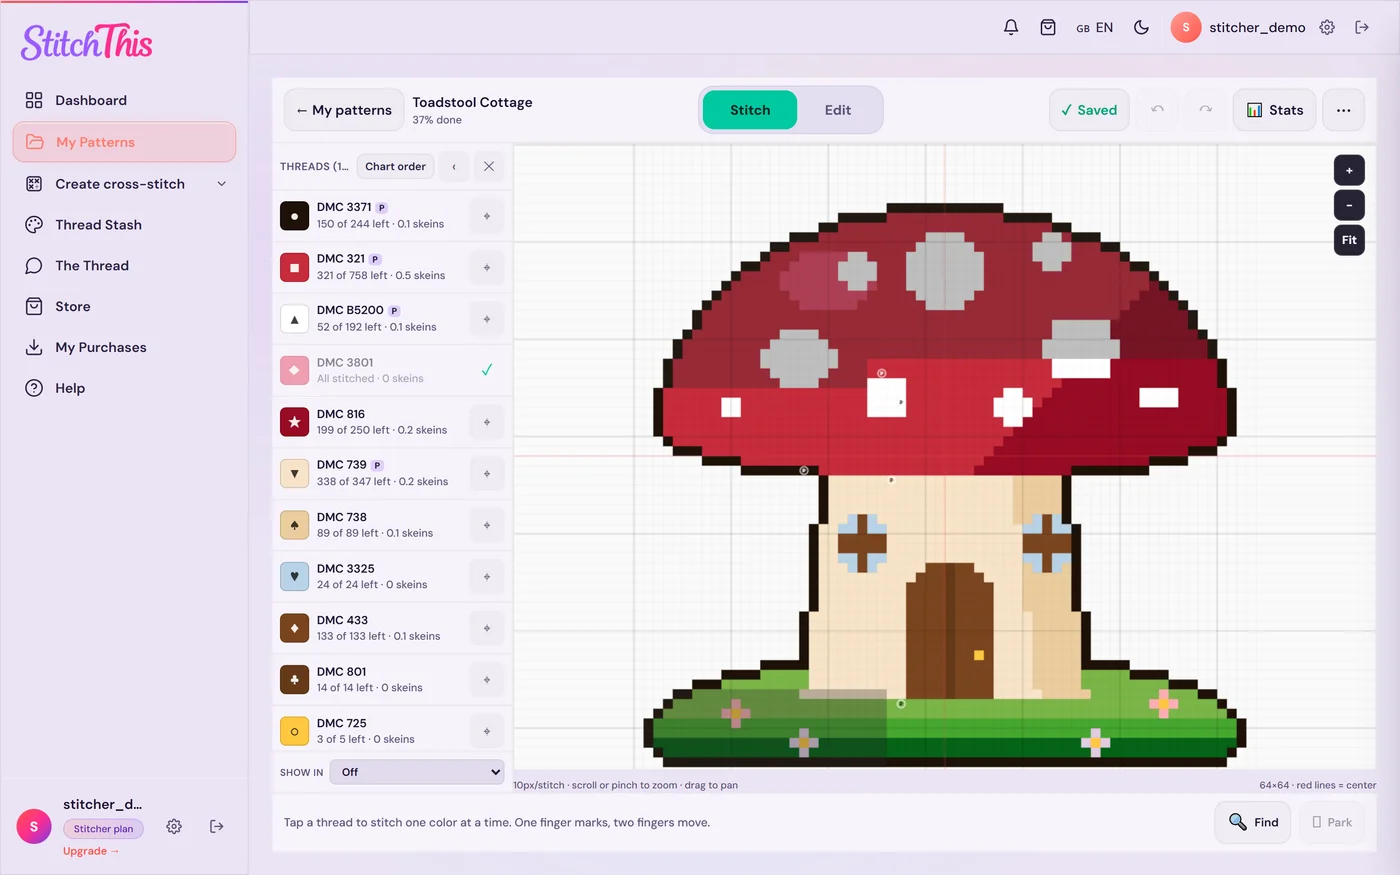
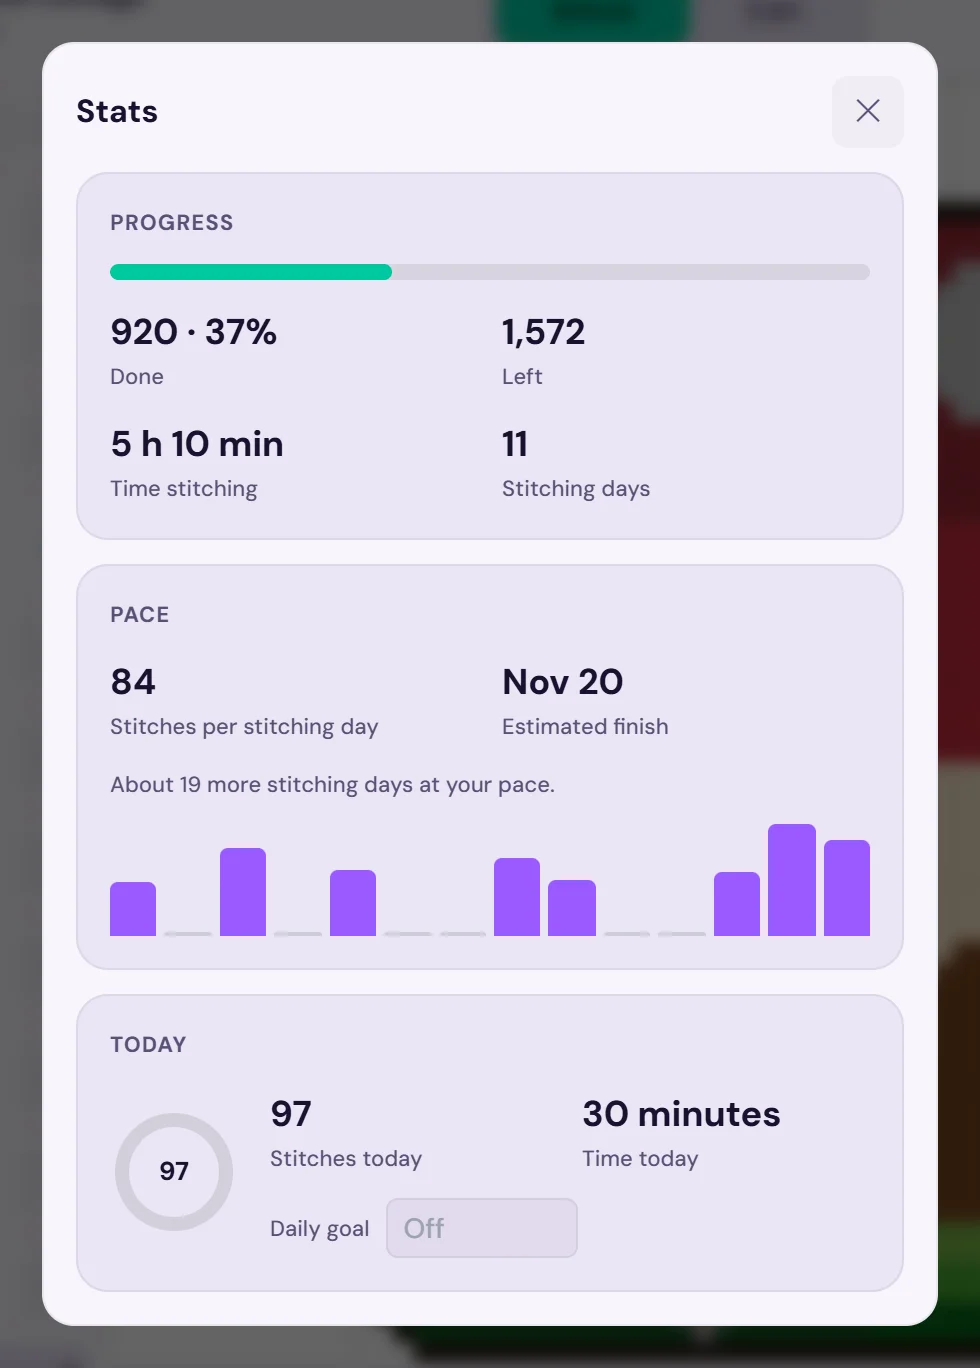
Starting partway through a project? Mark the area you've already stitched in blocks, and the stats pick up from there. The free plan tracks 2 patterns at a time; Stitch Tracker ($19.97 a year, renews every year; cancel anytime and keep every chart) or Maker removes the limit. See the PDF pattern tracker and the project tracker, or try StitchThis free and mark your first stitches tonight.
Prefer paper, or want a backup? Here are the classic methods.
Method 1: Highlighter on a working copy
The classic. Print a working copy of the chart (keep the original clean) and run a highlighter over each area as you finish it.
How to do it well:
- Use a light color such as yellow or light green, so the symbols underneath stay readable. Test it on a corner first; some highlighters smear certain printer inks.
- Highlight after each session, not after each stitch. Finish a block, check it against the chart, then highlight the block.
- Work in 10×10 blocks. The bold grid lines divide the chart into blocks of 100 squares. Highlighting whole blocks is quicker and makes counting easy: 37 highlighted blocks is about 3,700 stitches, minus any empty squares.
- Mark skipped stitches with a small dot in another color so you don't think a block is finished when it isn't.
- Some stitchers highlight by color, using one highlighter per thread. It's pretty, but slower, and you'll run out of distinguishable highlighter colors long before you run out of threads.
Limits: you can't un-highlight a mistake, the chart gets harder to read as you go, and a multi-page chart needs to be assembled from several PDF pages first. It gives you your place, but not your numbers.
Method 2: Sheet protector and wipe-off marker
Slide each chart page into a clear sheet protector and mark finished stitches with a wet-erase or dry-erase marker. Mistakes wipe off, the paper stays clean, and you can reuse the chart for a second stitch-through.
Tips:
- Wet-erase markers are less likely to smudge when your hand brushes the page than dry-erase ones. Test yours on the protector first.
- Use a fine tip for small areas so you can see the symbols.
- Watch the edges. Marker on a protector can rub off in a project bag. Store marked pages flat in a folder.
This is the best paper method if you make mistakes or like to stitch a pattern more than once. It shares the highlighter's limits: no numbers, and pages to manage.
Method 3: A block map
For a large chart, a block map is a small grid where each cell stands for one 10×10 block of the chart. A 150×200 chart becomes a 15×20 map that fits on one index card. Fill in a cell when its block is done (or half fill it when it's partly done). It's a quick way to see the whole project at a glance, and to count progress: filled cells times 100, roughly.
It pairs well with either of the methods above: highlight the chart for detail, and fill the map for the big picture.
Method 4: A progress spreadsheet
If you like numbers, a spreadsheet turns your highlighting into stats. The layout below tracks one project, with one row per stitching day: if you stitch twice in a day, add both sessions into that day's row, so the day count stays a true count of stitching days. (For several projects, keep a separate sheet per project, or a simple one-row-per-project list without the formulas.)
What you need: total stitches
Many charts list stitch counts in the key, per color. Add them up for the total. If yours doesn't, estimate: width × height × the share of the fabric that's covered. A 150×200 chart with about 80% coverage is around 150 × 200 × 0.8 = 24,000 stitches. (The cross-stitch calculator helps with fabric size and floss for a stitch count.)
The columns
Put headings in row 1 and your first stitching day in row 2. Fill in A, B and D yourself; copy the formulas down from row 2 (C3 is the one exception, shown below).
| Column | Example | Formula in row 2 |
|---|---|---|
| A: Date | 2026-11-01 | |
| B: Stitches that day | 420 | |
| C: Total done | 6,000 | =B2 in row 2, then =C2+B3 in row 3, copied down |
| D: Total stitches | 24,000 | Type it once per row, or =$D$2 |
| E: Percent done | 25% | =C2/D2 (format as a percentage) |
| F: Stitching days so far | 15 | =ROW()-1 (one row per day) |
| G: Average per stitching day | 400 | =C2/F2 |
| H: Stitching days left | 45 | =(D2-C2)/G2 |
| I: Finish date | =TODAY()+ROUNDUP(H2*7/4,0) (format as a date) |
Started partway through? Put the stitches you'd already done in a cell of their own (say K1), add them in the percent (=(C2+$K$1)/D2) and the days left (=(D2-C2-$K$1)/G2), but leave them out of column C. That way they count toward how far along you are, not toward your pace.
Turning that into a finish date
The 4 in column I is how many days a week you stitch this project. If you know that number directly, that's all the adjustment you need: it already reflects any rotation with other WIPs. Only work out a share when you're starting from your overall schedule: stitching six days a week split evenly across two WIPs is about three days a week for each. Our guide to managing multiple WIPs walks through a full example, and the free cross stitch tracker spreadsheet has all of this built in.
Limits: a spreadsheet only knows what you type into it. Counting a day's stitches means counting highlighted squares, which is the tedious part, and it doesn't help you find your place on the chart.
Method 5: A tracker app
A tracker app reads the chart itself, so marking a stitch updates the numbers: no counting, no typing. Look for tap, drag and block marking; highlighting one color at a time; stats with a finish estimate; stitches left per thread; and sync and offline use. That's the workflow StitchThis gives you, shown step by step above. Comparing apps? See the best cross stitch tracker apps and which PDFs work with tracker apps.
The methods compared
| Method | Keeps your place | Gives you numbers | Fixes mistakes | Cost |
|---|---|---|---|---|
| Highlighter on a copy | Yes | No | No | Printing |
| Sheet protector + marker | Yes | No | Yes | Protectors, markers |
| Block map | Roughly | Roughly | Yes (pencil) | An index card |
| Spreadsheet | No | Yes | Yes | Free, your time |
| Tracker app | Yes | Yes, automatically | Yes | Free to paid |
Many stitchers combine two: a highlighted chart for their place and a spreadsheet for the numbers. StitchThis replaces both, and adds your floss stash and your other projects in the same place, which is why people with several projects tend to switch.
The numbers worth keeping
- Percent done. The most motivating single number.
- Stitches left per thread. Tells you when to buy floss, and when a color is finished so you can retire it from your project bag. Pair it with a stash list; the floss stash organization guide shows how.
- Pace. Stitches per stitching day. Compare it month to month, not day to day.
- Estimated finish date. Only meaningful after a few sessions; early estimates swing wildly.
- Progress photos. Not a number, but a photo of the fabric at each milestone is the most satisfying record of all. A phone album per project is enough, and posting each milestone in the community forum's WIP board turns it into encouragement from other stitchers.
Frequently asked questions
What's the easiest way to track cross-stitch progress? For simply keeping your place, highlight finished stitches on a printed working copy of the chart, one 10×10 block at a time. For counts, a percent done, a finish date and sync across devices without any math, mark off the chart in StitchThis.
How do I work out what percent of my cross stitch is done? Divide stitches done by total stitches. Get the total from the key's stitch counts, or estimate it as width × height × the share of fabric covered. Counting highlighted 10×10 blocks and multiplying by 100 gives a quick estimate of stitches done.
How do I estimate when I'll finish a cross-stitch project? Divide stitches left by your average stitches per stitching day to get stitching days left, then convert to calendar time based on how often you stitch it. StitchThis does this for you, using how often you really stitch.
Can I mark stitches on a PDF pattern? In a general PDF reader you can draw highlights over the page, but the app doesn't know what a stitch is, so there are no counts. A cross-stitch tracker reads the chart so each stitch can be marked and counted.
What's the best marker for marking a chart in a sheet protector? A fine-tip wet-erase marker. It smudges less than dry-erase when your hand brushes it, and wipes off with a damp cloth.
How do I track progress on several projects? Keep one row per project in a spreadsheet, or let StitchThis keep progress for each pattern separately, with every project grouped by In progress, Not started and Completed. The guide to organizing cross-stitch patterns covers keeping the charts themselves in order, and the symbols and notation guide helps when a chart's markings are hard to follow.
Track it your way, but track it
Whichever method you choose, the habit matters more than the tool: mark what you've done at the end of every session. Paper keeps your place; numbers keep you going. If you'd like both without the counting, plus your floss stash and every other project in one place, start tracking free in StitchThis.
Už máš predlohu v PDF?
Nahraj ju do StitchThis a vyšívaj podľa nej na obrazovke: priblíž si ktorúkoľvek časť, označuj stehy priebežne a pokračuj tam, kde to máš rozrobené.
Importovať PDF zadarmoBezplatný plán: 2 importované predlohy a sledovanie 2 predlôh naraz, bez časového obmedzenia. Netreba kartu.