
StitchThis
BroderiKorsstingFellesskapPriser
Logg innRegistrer deg gratis
  1. Home
  2. ›Embroidery
  3. ›Make Your Own Pattern

Guide · design your own

How to Make Your Own Embroidery Pattern, Step by Step

You can picture exactly what you want to stitch, but you can’t find a pattern for it, and you’re not sure how to turn a sketch into something you can follow with a needle.

Here is how to design a hand embroidery pattern yourself, step by step: drawing it, choosing stitches and colors, writing a key, and what every good pattern includes.

Make my embroidery patternRead the guide
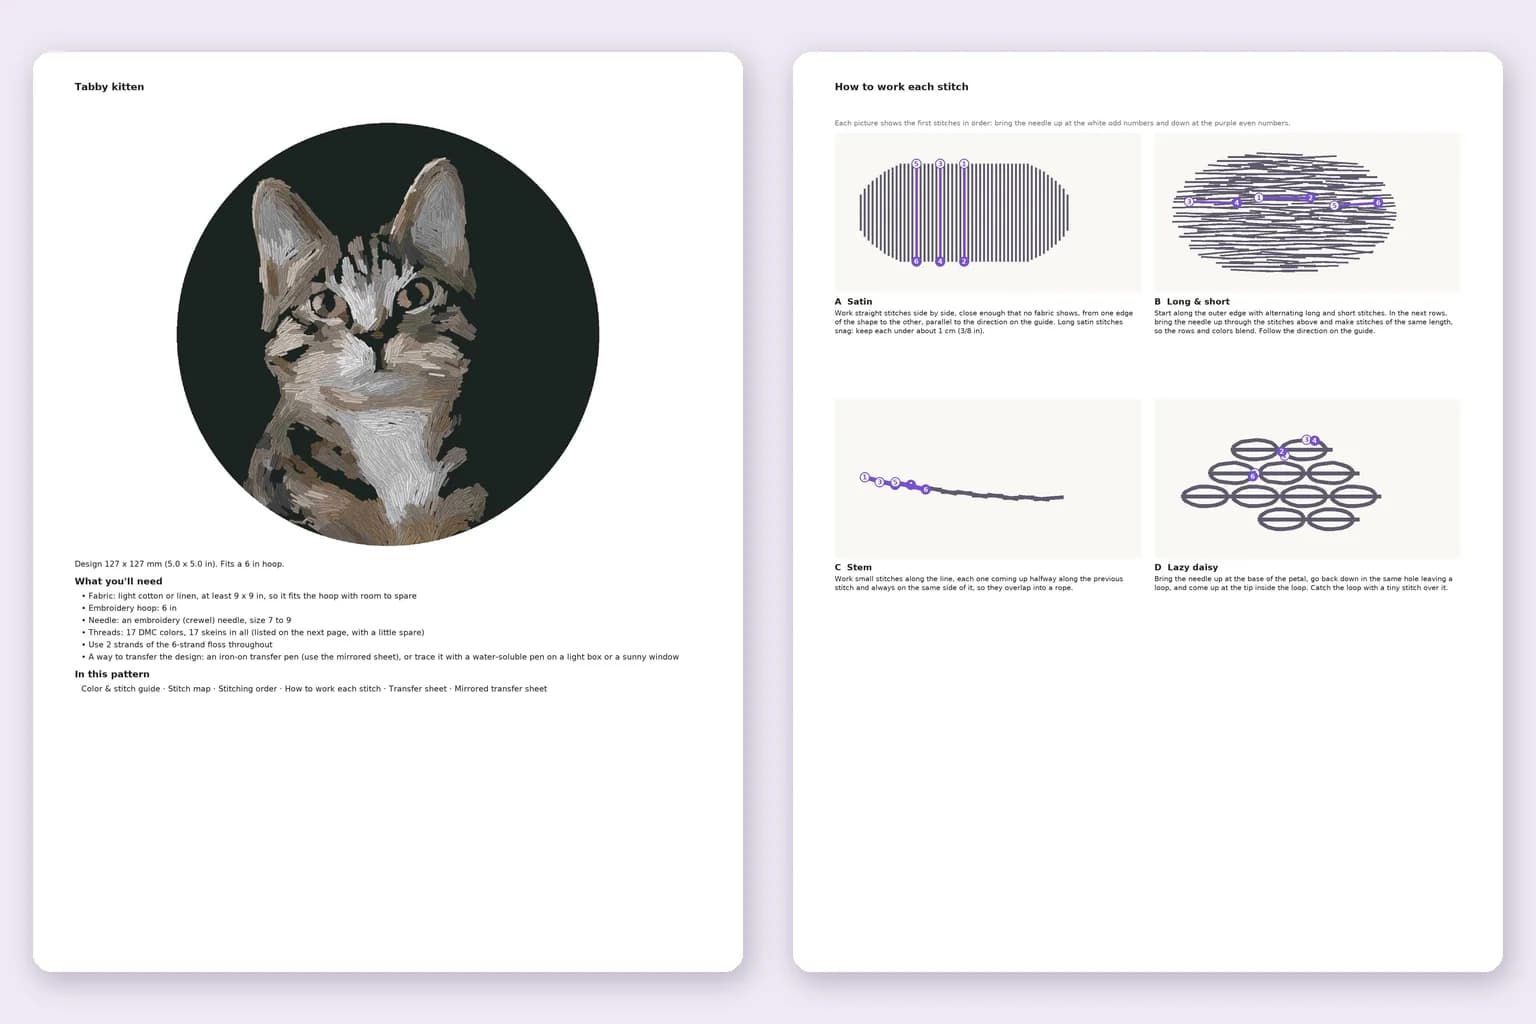
Two pages of a StitchThis embroidery pattern PDF: the cover with the materials list, and the stitch guide with numbered diagrams

Make an embroidery pattern by hand

  1. 1

    Draw or trace your design

    Sketch it, or trace a photo, a drawing or a plant you have pressed. Work at the size you will stitch: draw a circle the size of your hoop’s inside and keep the design within it.

  2. 2

    Simplify to outlines

    Ink over the lines that matter and drop the rest. Every line should be an edge you will stitch to: the boundary of a color, a petal, a stem. Tiny details under a few millimeters are hard to stitch, so merge or leave them out.

  3. 3

    Choose a stitch for each area

    Fills get satin or long and short stitch, lines get backstitch or stem stitch, petals can be lazy daisies and dots French knots. Mark the stitch and the direction you want inside each shape.

  4. 4

    Pick colors and write a key

    Choose floss by holding skeins against your drawing, number each color, and label every shape with its number and stitch. Note the strands, too.

  5. 5

    Transfer it to fabric

    Trace it on a light box, or redraw it mirrored for an iron-on pen, or print onto stick-and-stitch stabilizer. See how to transfer an embroidery pattern to fabric.

Matching stitches to shapes

A starting point for choosing stitches
Part of the designGood stitchWhy
Wide areas, shading[Long and short stitch](/embroidery/stitches/long-and-short-stitch)Blends shades and covers big areas without long loose stitches
Small, smooth shapes[Satin stitch](/embroidery/stitches/satin-stitch)Glossy, solid fill; keep stitches under about 1 cm (3/8 in)
Outlines, lettering[Backstitch](/embroidery/stitches/backstitch)Crisp, even line that follows curves when stitches are short
Stems, curving linesStem stitchRope-like line that bends smoothly
Small petals, leaves[Lazy daisy](/embroidery/stitches/lazy-daisy)One loop makes a whole petal
Dots, centers, eyes[French knot](/embroidery/stitches/french-knot)Raised texture in one stitch

The [embroidery stitches guide](/embroidery/stitches) has a numbered diagram for each.

See your own photo as a hand embroidery pattern: stitches, directions, threads and a printable transfer.

Try the pattern maker

The faster route: let StitchThis draft it

If your idea starts as a photo or a child’s drawing, you can skip the drafting. Make a hand embroidery pattern from your photo: pick a frame and a size from 2 to 7 inches, and the generator simplifies the colors to real threads, splits the picture into shapes and chooses a stitch and direction for each one.

Then make it yours in the editor: change any stitch, turn a direction, recolor, split or merge shapes, add outlines or draw your own backstitch lines. It is free to design and preview, and the PDF has everything a hand-drawn pattern would, worked out for you.

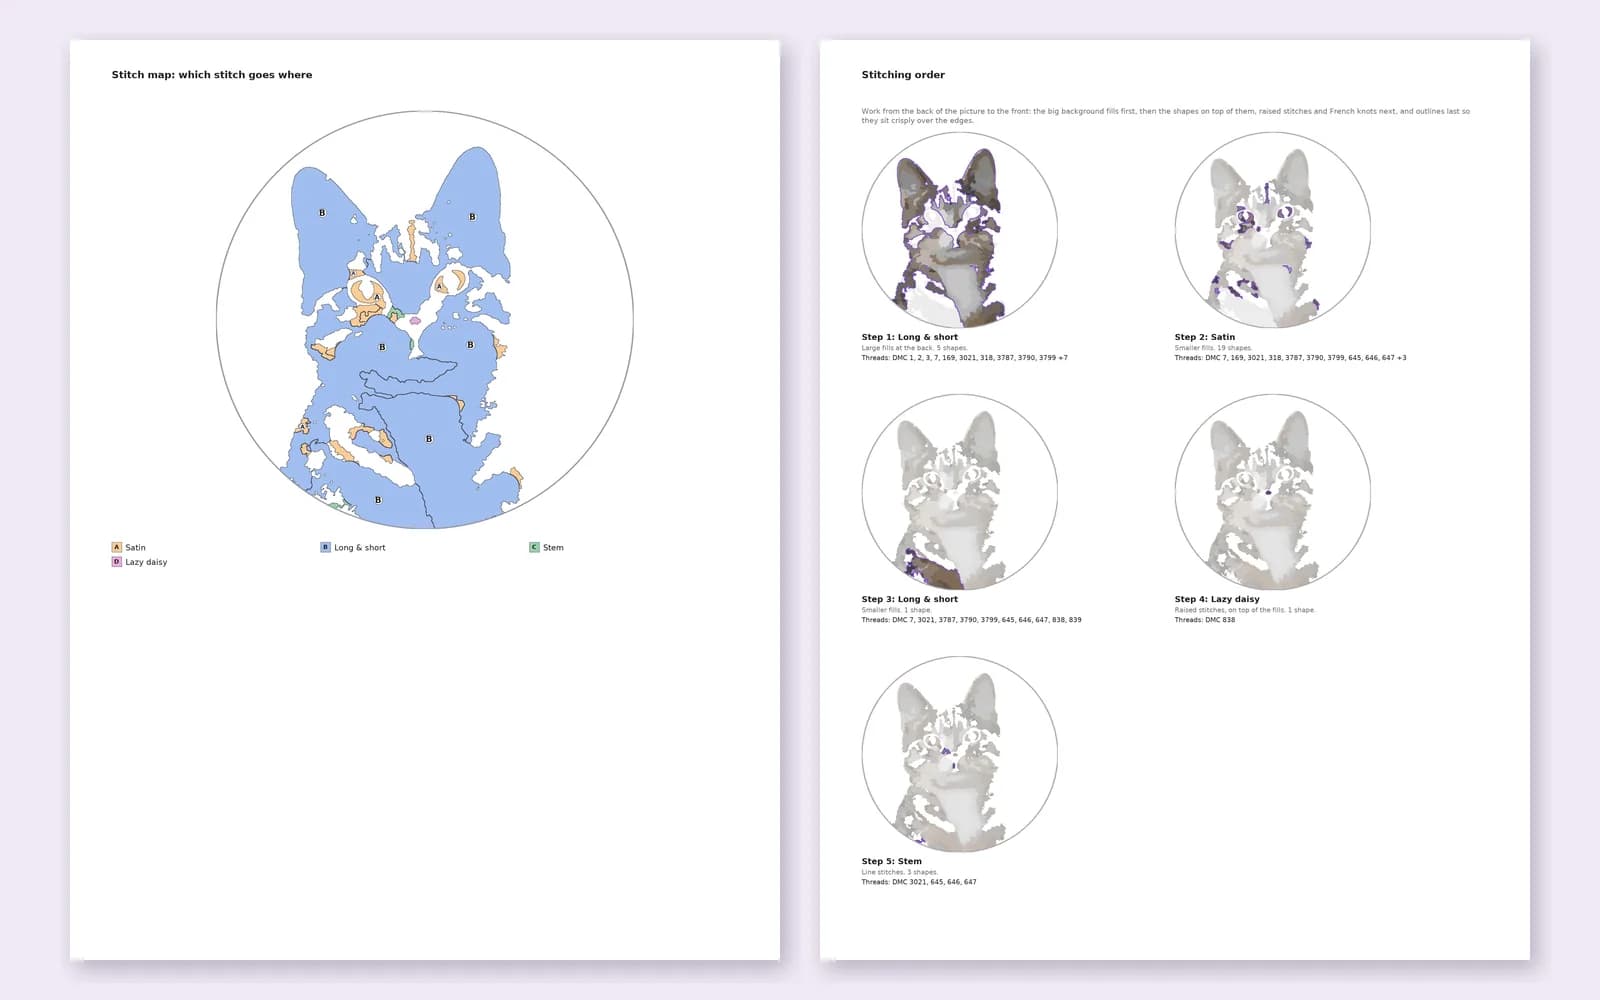
Two PDF pages: the stitch map lettering every shape by its stitch, and the stitching order in numbered steps with a thumbnail for each step
The stitching order: back to front, with a thumbnail for every step.

What a good embroidery pattern includes

  • A color key

    Every thread by brand and number, with the strands to use and enough skeins to finish. A numbered key keeps similar shades apart.

  • A stitch for every area

    Each shape labeled with its stitch so nothing is left to guess, plus how to work any stitch the stitcher may not know.

  • Stitch direction

    Arrows or ticks showing the angle for each fill. Direction is what makes satin gleam and long and short look natural.

  • A stitching order

    Back to front: big fills first, then smaller fills, raised stitches and knots, line stitches and outlines last.

  • A transfer at true size

    Line art printed at the finished size with a ruler to check the scale, and a mirrored copy if the stitcher uses an iron-on pen.

Every StitchThis embroidery pattern includes all five, along with fabric, hoop and needle sizes. If you prefer a different floss brand than the one you designed with, the floss converter finds the closest match.

Frequently asked questions

How do I turn a drawing into an embroidery pattern?

Trace the drawing at the size you want to stitch, simplify it to clear outlines, choose a stitch and color for each area and write a key. Or upload it to the embroidery pattern generator and it does those steps for you.

What do I need to design my own embroidery pattern?

Paper, a pencil and a fine pen, a ruler or compass for the hoop outline, your floss to pick colors, and a way to transfer the design, such as a light box and a water-soluble pen.

Can I base my pattern on a photo?

Yes. Print the photo at the size you want, trace only the main shapes and edges, then simplify the colors. How to embroider a photo walks through it.

How big should my embroidery design be?

Small enough to fit inside your hoop with room around it. Leave at least 2 inches of fabric beyond the design on every side so it can be hooped and framed.

How do I put my own design on fabric?

Trace it on a light box or bright window, use an iron-on transfer pen with a mirrored copy, or print onto stick-and-stitch stabilizer. The transfer guide explains each.

Should I mark stitch direction on my pattern?

Yes, for any fill bigger than a few millimeters. A few light lines or arrows inside each shape keep satin and long and short stitches at the angle that catches the light the way you planned.

Keep going

  • Turn Any Photo Into a Hand Embroidery PatternUpload a picture and get a real hand embroidery pattern: every shape has a stitch and a direction, every color is a…
  • How to Transfer an Embroidery Pattern to Fabric (Every Method Compared)Here is every common transfer method side by side: what each one is best for, what you need and where it goes wrong,…
  • Embroidery Stitches: A Visual Guide to the Stitches That MatterHere are the 21 hand embroidery stitches our patterns use, grouped by job, with step-by-step guides to the five…
  • How to Embroider a Photo: From Picture to Hand-Stitched HoopThis guide shows how embroiderers translate a photo: choose the picture, simplify it, give each area the right stitch…

All embroidery guides and tools

Turn your photo into a hand embroidery pattern

Making and editing a pattern is free with a StitchThis account. Saving it or downloading the PDF uses a pattern credit ($5.99 per pattern, or 5 for $20). Embroidery is included in Maker ($5.99/month) and in Craft Unlimited, with unlimited patterns.

Make my embroidery patternCreate a free account
StitchThis

Det komplette digitale arbeidsrommet for korsstingskapere.

Broderi

  • Fra foto til broderimønster
  • Broderisting
  • Slik overfører du et mønster
  • Garnkonverterer
  • Alle broderiguider

Hekling

  • Garment Pattern Maker
  • Sweater Pattern Generator
  • Beanie Calculator
  • Yarn Calculator
  • Photo to Crochet Pattern
  • Chart Maker
  • Graphgan Pattern Maker
  • C2C Pattern Maker
  • Symbol Chart Maker
  • Amigurumi Pattern Generator
  • Photo to Amigurumi
  • Stitch Fiddle Alternative

Produkt

  • Mønsterverktøy
  • StitchSense
  • Mønsterbutikk
  • Fellesskap
  • Priser

Selskap

  • Om oss
  • Kontakt
  • Hjelp
  • Kundestøtte

Juridisk

  • Vilkår for bruk
  • Personvernerklæring

© 2026 StitchThis. Med enerett.

Laget med kjærlighet til broderere overalt.