
StitchThis
BroderiKorsstingFellesskapPriser
Logg innRegistrer deg gratis
  1. Home
  2. ›Embroidery
  3. ›Stitches
  4. ›Long and short stitch

Stitch guide · thread painting

Long and Short Stitch: How to Thread Paint Soft Shading

Your shading comes out in stripes, every row shows, colors jump instead of blending, and big areas look flat instead of like fur, feathers or petals.

Long and short stitch blends because each row splits back into the one before. Stagger the lengths, follow the direction, and change colors gradually. Here’s how, step by step, with fixes for the common problems.

Make my embroidery patternRead the guide
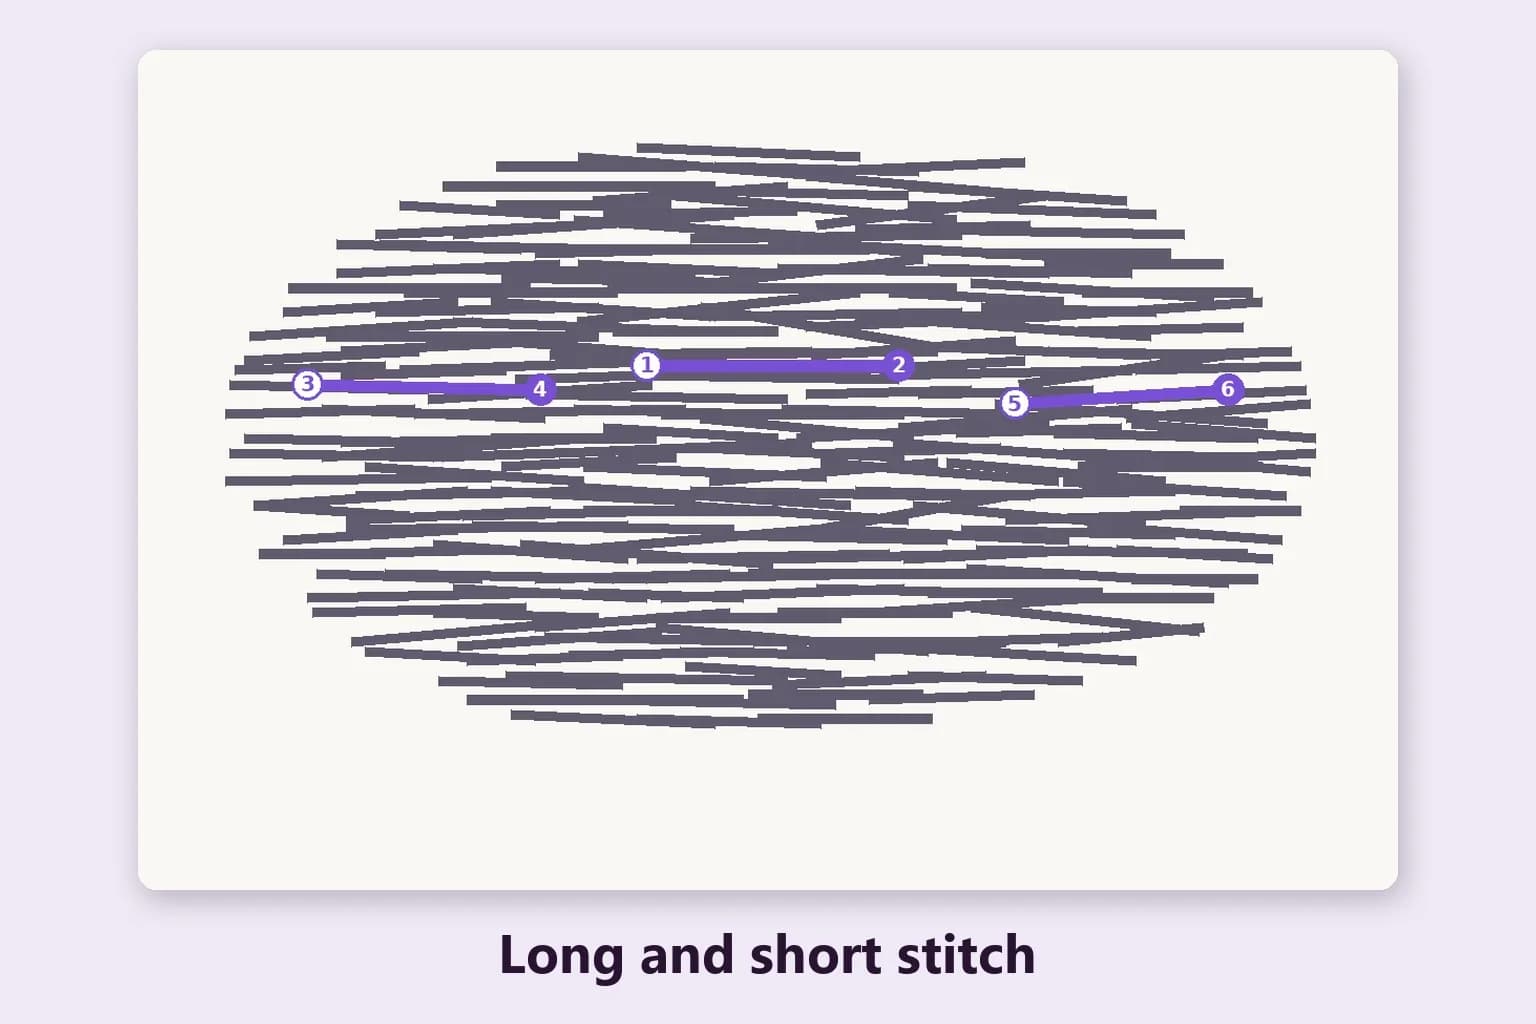
Long and short stitch diagram: overlapping straight stitches of different lengths across an oval, labeled Long and short stitch

What long and short stitch is and when to use it

Long and short stitch, also called soft shading or needle painting, fills a shape in staggered rows of straight stitches. The first row alternates long and short stitches; every row after that comes up through the stitches above, so the rows interlock and the joins disappear. That is what lets one color melt into the next.

It is the stitch behind thread painting: realistic flowers, birds, pet portraits and photo embroidery. Because no single stitch has to cross the whole shape, it covers wide areas that would be far too long for satin stitch. If you want to embroider a photo, this is the stitch you’ll use most.

How to do long and short stitch, step by step

  1. 1

    Draw a few direction lines

    Lightly mark lines across the shape following the stitch direction on your pattern: the way fur grows or a petal curves. They keep the angle right as the rows go on.

  2. 2

    Outline the edge in split stitch

    A split stitch outline along the outer edge gives the first row a crisp, slightly raised line to cover.

  3. 3

    Work the first row: long, short, long, short

    Start along the outer edge. Come up inside the shape and go down just over the outline, alternating long and short stitches, side by side and following the direction.

  4. 4

    Next rows: come up through the stitches above

    Bring the needle up through the ends of the stitches in the row before, splitting them, and make stitches of the same length. Vary where each one starts so the row ends don’t line up.

  5. 5

    Change color a row at a time

    Start each new shade by splitting back into the previous color, and let a few stitches of each shade reach into the next. Blends look smoother with a middle shade between two far-apart colors.

  6. 6

    Turn the corners gradually

    On curves, fan the stitches a little each row and tuck in a shorter stitch where they spread apart, so the direction turns smoothly.

  7. 7

    Finish at the inner edge

    The last row ends at the far edge or tucks under the next shape. Use shorter stitches there to fill the gaps.

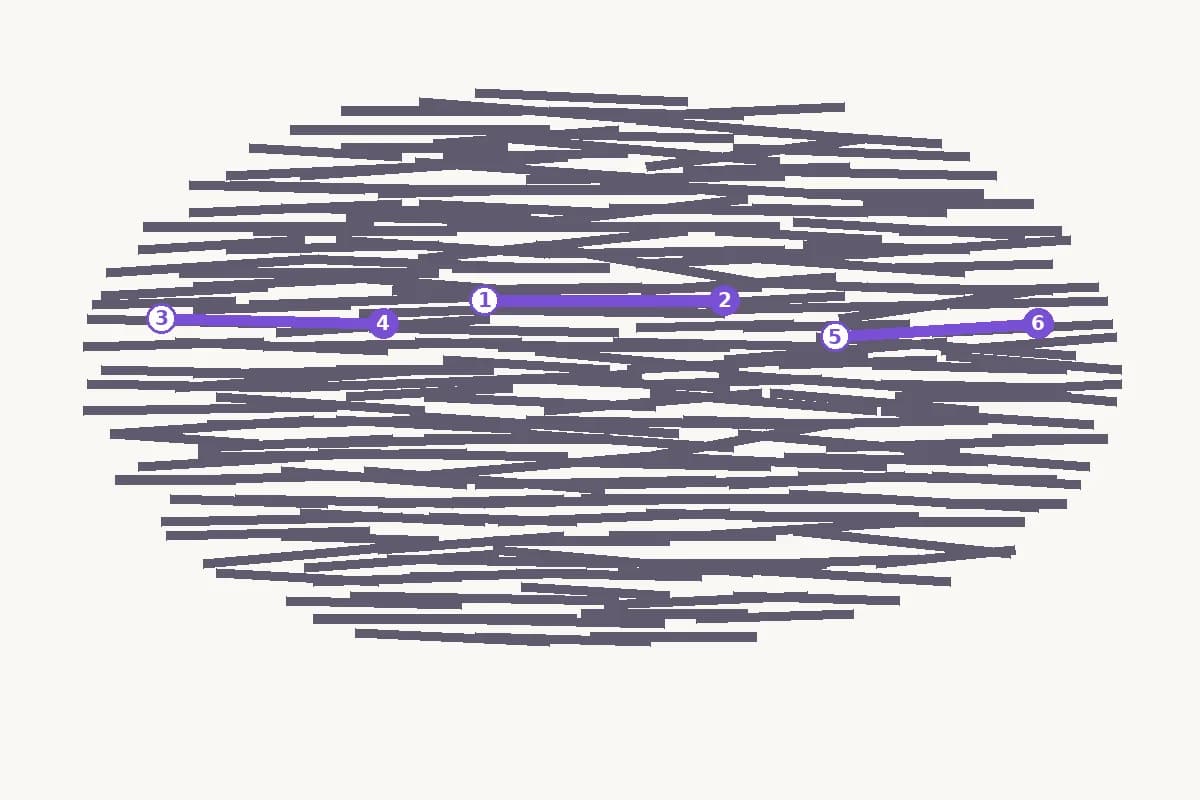
Long and short stitch diagram: straight stitches of different lengths overlapping across an oval, with the first stitches numbered in order
Stitches of different lengths overlap and split into each other, so the rows and colors blend instead of banding.

See your own photo as a hand embroidery pattern: stitches, directions, threads and a printable transfer.

Try the pattern maker

How many strands for thread painting

Our patterns use 2 strands of six-strand floss, a good balance of coverage and blending for pieces up to 7 inches. Many thread painters drop to 1 strand for small, detailed work such as eyes and fine fur, because finer thread blends more smoothly; 3 strands fills faster but shows rows more.

Splitting into the previous row is easier with fewer strands, too. More on choosing in how many strands of floss.

Long and short stitch problems and how to fix them

  • Visible rows or stripes

    Row ends line up. Vary stitch lengths, start each stitch at a different point, and split further back into the row above.

  • Colors jump instead of blending

    The shades are too far apart or change all at once. Add an in-between shade, and let stitches of each color reach a little into the next.

  • The direction wanders

    Without guide lines the angle drifts. Draw a few direction lines first and check every few stitches against them.

  • Gaps on curves

    Stitches fan apart around a bend. Tuck a shorter stitch into each gap so the coverage stays even.

  • Bulky, stiff or puckered fabric

    Too many strands or stitches packed too tight. Use 1–2 strands, keep the fabric drum-tight, and let stitches lie flat without pulling.

  • Hard outer edge looks jagged

    Start with a split stitch outline and take the first row over it, so the edge stays smooth.

Variations and close relatives

  • Tapestry shading

    Long and short with the rows kept more regular, often worked in wool: a bolder, more graphic blend.

  • Encroaching satin

    Rows of satin that start between the stitches above. It shades a little more simply, with a striped look.

  • Split stitch fill

    Rows of split stitch side by side follow tight curves well and suit small areas of color.

  • Satin for narrow shapes

    Where a shape is narrow enough for one stitch to cross it, satin stitch is quicker and smoother.

Where StitchThis uses long and short stitch

When you turn a photo into a hand embroidery pattern, the generator gives wide areas long and short stitch, the thread-painting fill, and narrower fills satin. Every fill gets a stitch direction, shown as ticks on the PDF’s color and stitch guide, and the big fills come first in the stitching order.

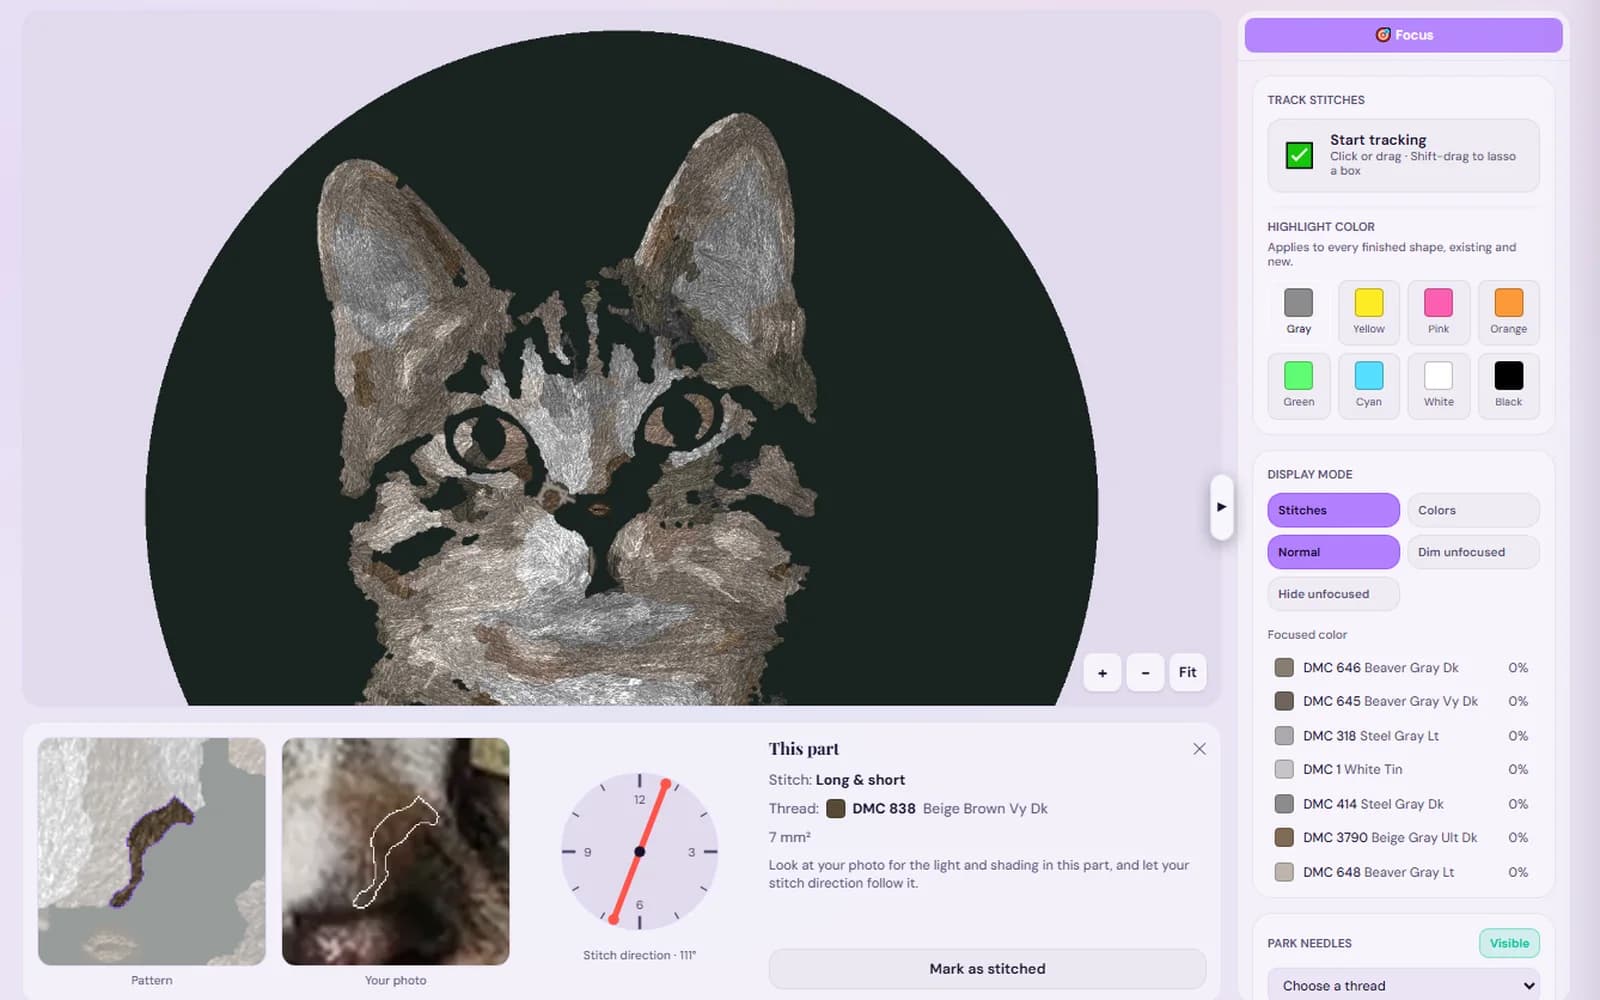
Thread painting is easiest when you can see what you’re copying. The stitch tracker’s part card shows the pattern crop, the matching crop of your original photo and the direction on a clock face, so you can match texture and shading to the photo as you go. In the editor you can turn any shape’s direction, recolor a single color patch, and preview the whole piece in a realistic thread view.

See how your photo would shade: make a hand embroidery pattern from your photo. For the full project walkthrough, read how to embroider a photo, or browse all the embroidery stitches.

The StitchThis stitch tracker with a part card showing a pattern crop, the matching crop of the original photo and a stitch-direction clock face
The part card puts the pattern, the photo and the stitch direction side by side while you shade.

Frequently asked questions

What is the difference between long and short stitch and satin stitch?

Satin stitch crosses a shape in one pass, so it suits narrow shapes. Long and short works in staggered rows that split into each other, so it covers any width and can blend colors.

Is long and short stitch the same as thread painting?

Thread painting (or needle painting) is the style; long and short stitch, also called soft shading, is the stitch most thread painting is done in.

How do I stop rows showing in long and short stitch?

Vary stitch lengths, start each stitch at a different point, and come up through the stitches of the row above rather than below them.

How many strands for long and short stitch?

One or two. Our patterns use two; one strand blends more finely on small, detailed work. See how many strands of floss.

How long should the stitches be?

Keep them comfortably short, well under the 1 cm (3/8 in) where stitches start to snag, and shorter still on tight curves and small details.

How do you blend colors in long and short stitch?

Change shade one row at a time, split back into the previous color, and let a few stitches of each shade reach into the next. Add a middle shade if two colors are far apart.

Is long and short stitch hard for beginners?

It takes practice to get smooth, but the moves are simple straight stitches. Start with one color on a leaf, then try two shades.

Keep going

  • Embroidery Stitches: A Visual Guide to the Stitches That MatterHere are the 21 hand embroidery stitches our patterns use, grouped by job, with step-by-step guides to the five…
  • How to Satin Stitch: Smooth Fills with Clean EdgesSatin stitch is simple stitches laid side by side. The smooth finish comes from a few habits: keep stitches short,…
  • How to Embroider a Photo: From Picture to Hand-Stitched HoopThis guide shows how embroiderers translate a photo: choose the picture, simplify it, give each area the right stitch…
  • How Many Strands of Embroidery Floss Should You Use?Use this chart to pick the strand count for each stitch and look, match it to a needle, and work out how much floss…

All embroidery guides and tools

Turn your photo into a hand embroidery pattern

Making and editing a pattern is free with a StitchThis account. Saving it or downloading the PDF uses a pattern credit ($5.99 per pattern, or 5 for $20). Embroidery is included in Maker ($5.99/month) and in Craft Unlimited, with unlimited patterns.

Make my embroidery patternCreate a free account
StitchThis

Det komplette digitale arbeidsrommet for korsstingskapere.

Broderi

  • Fra foto til broderimønster
  • Broderisting
  • Slik overfører du et mønster
  • Garnkonverterer
  • Alle broderiguider

Hekling

  • Garment Pattern Maker
  • Sweater Pattern Generator
  • Beanie Calculator
  • Yarn Calculator
  • Photo to Crochet Pattern
  • Chart Maker
  • Graphgan Pattern Maker
  • C2C Pattern Maker
  • Symbol Chart Maker
  • Amigurumi Pattern Generator
  • Photo to Amigurumi
  • Stitch Fiddle Alternative

Produkt

  • Mønsterverktøy
  • StitchSense
  • Mønsterbutikk
  • Fellesskap
  • Priser

Selskap

  • Om oss
  • Kontakt
  • Hjelp
  • Kundestøtte

Juridisk

  • Vilkår for bruk
  • Personvernerklæring

© 2026 StitchThis. Med enerett.

Laget med kjærlighet til broderere overalt.