How to Photograph Your Pet for a Cross-Stitch Pattern
The photo decides everything in a pet cross-stitch portrait. Learn how to shoot for the eyes and face, handle black or white pets, and rescue imperfect photos.
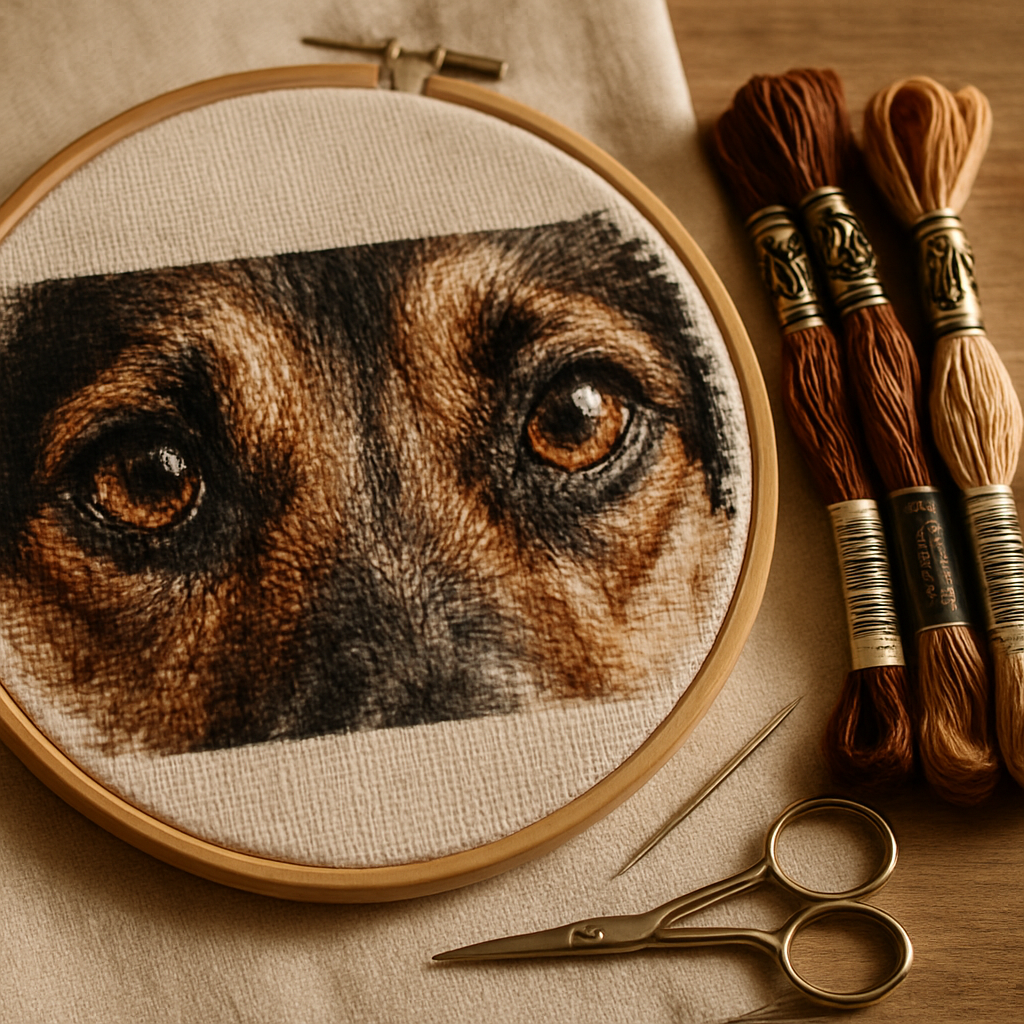
Ask anyone who's stitched a pet portrait what makes or breaks it, and they'll tell you the same thing: the eyes. Get the eyes right and the whole piece comes alive — you can feel the animal looking back at you. Get them wrong and it's just a vaguely dog-shaped arrangement of brown. The strange part is that this is decided long before the first stitch, and even before you open any software. It's decided the moment you take the photo.
A cross-stitch pattern can only be as good as the picture you start from. If you're planning to immortalize your dog, cat, horse, or the world's most photogenic guinea pig in thread, the most valuable thing you can do is spend ten minutes getting a better source photo. This guide shows you how — and what to do when the perfect photo isn't an option.
Why the photo matters more for cross stitch than anything else
 A phone screen is forgiving. It has millions of colors and enough resolution to smooth over a slightly soft focus or a dim room. A cross-stitch pattern is the opposite of forgiving. Converting a photo into stitches means collapsing all that information down to a grid of a few hundred squares, each one a single solid color from a limited floss palette.
That collapse is brutal on a weak photo. Soft focus becomes mush. A dark, shadowy face becomes an indistinct blob. A busy background competes with your pet for every precious stitch. Flaws you'd never notice on Instagram get amplified, because there's so much less room to hide them. (If you've ever wondered why a finished pattern looks bad, a weak source photo is one of the usual suspects.)
A pattern throws away detail — so start with more
The practical takeaway: you want to begin with more sharpness, more light, and more contrast than you think you need, because the conversion will spend most of it. A crisp, bright, well-composed photo gives the pattern something to work with. A dim, blurry one gives it almost nothing — and no tool can invent detail that was never captured.
What a good tool can do is spend that detail wisely. When you convert a pet photo on StitchThis, StitchSense holds detail where your eye lands — the eyes, the face — while calming the busy fur and background, so your pet's expression survives the trip to the grid instead of scattering into single stitches. That's the difference between a pattern that looks like your dog and one that looks like a generic brown animal. Try it free with your favorite photo →
What makes a great pet photo for cross stitch
 Five things matter, roughly in this order.
1. Light — soft and plentiful. Natural daylight is your best friend. Photograph near a big window or outside in open shade. Avoid direct on-camera flash, which flattens fur and kills the dimension that makes an animal look real. Soft, even light reveals texture and lets the eyes catch a highlight.
2. Focus on the eyes. If anything in the frame is sharp, it must be the eyes. Tap your phone screen right on the eye before you shoot so the camera locks focus there. Those tiny catchlights — the white sparkle reflected in the eye — are what give a pet portrait life, so make sure they're present and crisp.
3. An eye-level angle. Get down to your pet's level instead of shooting from above. A level angle reads as a portrait; a top-down angle reads as a snapshot and distorts the proportions of the face.
4. Fill the frame. The closer and larger your pet is in the photo, the more detail survives the conversion. A pet that's a small figure in a big room leaves you with too few stitches for the face. Get close, or crop in tight before converting.
5. A clean, contrasting background. A plain wall, a lawn, a blanket — anything simple and a different tone from your pet. A cluttered background fractures into confetti (scattered single stitches) and steals attention from your subject. The good news: a messy background is one of the easiest things to fix later, so don't abandon an otherwise great shot over it.
| What makes a photo work | What wrecks it |
|---|---|
| Soft natural daylight | Harsh flash or deep shadow |
| Eyes sharp, with catchlights | Soft focus, dull or hidden eyes |
| Eye-level angle | Shot from above |
| Pet fills the frame | Pet small in a big scene |
| Simple, contrasting background | Busy, cluttered background |
How to actually get the shot
 All of that assumes a cooperative model, which, if you own a cat, you do not. Here's how to work with reality.
- Use treats or a toy at the lens. Hold a treat right beside your phone to draw the eyes toward the camera. Have someone squeak a toy just behind you for that ears-up, alert expression.
- Shoot a burst. Don't take one photo; hold the shutter and fire off twenty. With a moving animal, you're fishing for the one frame where everything lines up. Burst mode turns luck into odds.
- Go to the light, don't add it. Move your pet near a window or step outside rather than reaching for the flash.
- Catch them calm. A sleepy, post-walk, or post-meal pet holds still far better than an excited one. Some of the best portraits happen when they're relaxed and watching you quietly.
- Take more than you need. Storage is free. The more frames you capture, the better your odds of one keeper with sharp eyes and a real expression.
Hard cases: black pets, white pets, and fluff
Some pets are genuinely harder to photograph well. These are the ones people struggle with most.
Photographing a black dog or cat
Black fur is the classic nightmare — cameras tend to render it as a flat, detail-free silhouette. The fix is light and angle. Use plenty of soft, directional light (from the side or front, not overhead) so it skims across the fur and reveals texture and contour. Slightly overexpose if your phone lets you — brightening a touch pulls detail out of the shadows. Aim for a background that's clearly lighter than your pet so the outline reads cleanly.
Photographing a white or very fluffy pet
White pets have the opposite problem: bright fur can "blow out" into a featureless white shape, losing all the gentle texture. Avoid harsh direct sun, favor soft overcast or window light, and if anything, expose slightly darker to keep detail in the fur. For very fluffy pets, contrast against a darker background helps the silhouette and the fur edges survive the conversion.
| Pet type | Main risk | Best move |
|---|---|---|
| Black fur | Flat, detail-free shadow | Soft side light; expose brighter; lighter background |
| White fur | Blown-out, textureless | Soft/overcast light; expose darker; darker background |
| Very fluffy | Edges and texture lost | Strong subject/background contrast; backlight the fluff edges |
Choosing the best photo when you already have a few
Often you're not taking a new photo — you're picking from a camera roll. Zoom all the way in on the face and eyes of each candidate. The winner is whichever has the sharpest eyes and the clearest expression, even if its background is messier or its framing looser. Sharpness and expression can't be added later; background and crop can. Pick for the eyes, fix the rest.
If you genuinely can't decide between two strong contenders, you don't have to. Tools like FORGE can generate several pattern variations from a source in one run, so you can compare results side by side rather than guessing which photo converts best.
When your only photo isn't great
Sometimes there's no retake. The pet has passed, or the only picture is a treasured but grainy phone shot from years ago. This is the most emotional version of the request, and it deserves an honest answer.
You can absolutely still make something beautiful — you just work with the photo deliberately instead of feeding it in raw. Crop tightly to the face to concentrate what detail exists. Boost contrast to recover separation in the fur. Clean up a distracting background so every stitch goes to your pet. None of this invents detail that was never there, but careful prep routinely turns a so-so photo into a portrait that genuinely captures the animal. For a memorial piece, that's everything. (Our pet portrait cross-stitch guide goes deeper on the finished-portrait side.)
Memorial photos: working with what you have Start from the photo where the eyes are clearest, even if it's older or smaller. Crop in close, lift the contrast gently, and simplify the background. The goal isn't a perfect photo — it's preserving the expression you remember.
Prepping your photo before you convert
Even a great photo benefits from a quick prep pass, and a weak one needs it. This is where StitchThis's built-in image tools earn their place. Before you ever generate a pattern, you can:
- Remove the background automatically, so your pet stands alone and the conversion doesn't waste stitches on clutter behind them.
- Boost contrast, pulling detail out of dark fur or a flat, evenly lit shot.
- Merge two photos when, say, the best body shot and the best face shot are different frames.
- Apply a painterly style transformation if you want a softer, more illustrated look rather than a literal photo conversion.
Then, when you convert, StitchSense keeps detail concentrated where it matters — the face and eyes — while calming busier areas, so your pet's expression survives the trip to the grid instead of dissolving into scattered single stitches. The result is a portrait that reads as your pet, not a generic animal shape. (If you want the full conversion walkthrough, see how to turn a photo into a cross-stitch pattern.)
The 10-second photo check before you convert
- Are the eyes sharp, with visible catchlights?
- Is the face well-lit, not buried in shadow?
- Does the pet fill most of the frame?
- Is the background simple — or easy to remove? If you can say yes to the first three, you're in great shape.
Why pet portraits come out better on StitchThis A pet portrait asks a lot of your tools, and StitchThis is built for exactly this:
- Built-in image tools — automatic background removal, contrast enhancement, two-photo merging, and painterly style transformation — to rescue and prep an imperfect or irreplaceable photo before you convert.
- StitchSense keeps the eyes and face crisp while quieting the fur and background.
- Multi-brand floss palettes (DMC, Anchor, Cosmo, Gamma, Madeira, Metro) and a floss stash tracker so you can stitch with colors you already own.
- An in-browser editor to fine-tune the eyes or fur by hand, then export a clean PDF.
- A genuine free tier Make your pet's portrait free →
From photo to pattern: what to expect
A strong photo, lightly prepped, converts into a pattern where the eyes are crisp, the fur has believable texture, and the background doesn't fight your subject. A weak photo will always cap your result — which is exactly why the photo is the step worth slowing down for. Spend your effort here, at the source, and everything downstream gets easier. If you want to sanity-check how a given pet image is likely to convert, our piece on the stitchability spectrum explains what kinds of images stitch cleanly and which fight you.
Frequently asked questions
Can I use a phone photo for a pet cross-stitch pattern? Yes — modern phone cameras are more than good enough. What matters far more than the device is light, focus on the eyes, and how much of the frame your pet fills. A well-shot phone photo beats a poorly shot professional one every time.
Does photo resolution matter? It helps, but it's not the headline. A sharp, well-lit, tightly framed photo at moderate resolution beats a huge file that's dark or blurry. Resolution can't rescue soft focus or bad light, so prioritize those first.
How do I photograph a black dog or cat so it doesn't come out as a blob? Use soft, directional light from the side or front to reveal fur texture, brighten the exposure slightly, and choose a background lighter than your pet so the outline reads. Avoid overhead light and direct flash.
My pet's eyes came out wrong in the pattern — what happened? Almost always the eyes weren't sharp or well-lit in the source photo, or the pet was too small in the frame to leave enough stitches for the face. Reshoot with focus locked on the eyes and the pet filling the frame, or crop tightly to the face before converting.
My only photo is old and grainy. Is it usable? Often, yes. Crop close to the face, boost contrast, and clean up the background to make the most of the detail that's there. It won't match a fresh, perfect shot, but careful prep can still produce a portrait that truly captures your pet — which is what matters for a memorial piece.
Can I make a pattern with two pets in one photo? You can, but each animal gets fewer stitches, so faces lose detail faster. For two pets, get as close as possible and keep both faces sharp and well-lit — or consider a separate portrait for each so neither expression is compromised.
The ten minutes that decide everything
A pet portrait in thread is a labor of love measured in weeks. The photo behind it takes ten minutes to get right. Shoot for the eyes, find soft light, fill the frame, and keep the background simple — and when the perfect photo isn't possible, prep the one you have with intention rather than feeding it in raw.
Ready to see your pet as a pattern? You can try StitchThis free. Prep your photo with the built-in image tools, then let the conversion keep the detail where it counts: those eyes looking right back at you. Try StitchThis free →
Related reading on StitchThis:
Ready to turn your photo into a cross-stitch pattern?
Try StitchThis freeTwo patterns per month. No card required.