Cross-Stitch for Beginners: How to Read a Pattern (Complete Guide)
How to read a cross-stitch pattern, from the chart and legend to backstitch, fractional stitches, and finding your starting point. A complete beginner's guide.
You're sitting at a table with your first cross-stitch pattern in front of you and the whole thing looks like a war map. Grids inside grids. Tiny symbols crammed into squares. A legend down the side with codes you don't recognize. Numbers along the edges. Arrows that seem to point at the middle. And somewhere in this mess is the answer to "where do I put my first stitch."
Welcome to the only genuinely confusing part of cross-stitch. Once you know how a pattern is built and what each piece of it is for, the rest of the craft is just patience and rhythm. This guide walks through everything — the chart, the legend, the symbols, where to start, how many strands of floss, what to do when you see angled stitches or outlines, and the most common mistakes that send beginners back to the start of a row. By the end you'll know exactly what you're looking at and you can begin.
What you're looking at — the anatomy of a cross-stitch pattern
 Every cross-stitch pattern has the same handful of parts, regardless of who designed it or where you got it. Knowing the names helps because every "help me read this pattern" conversation online uses them.
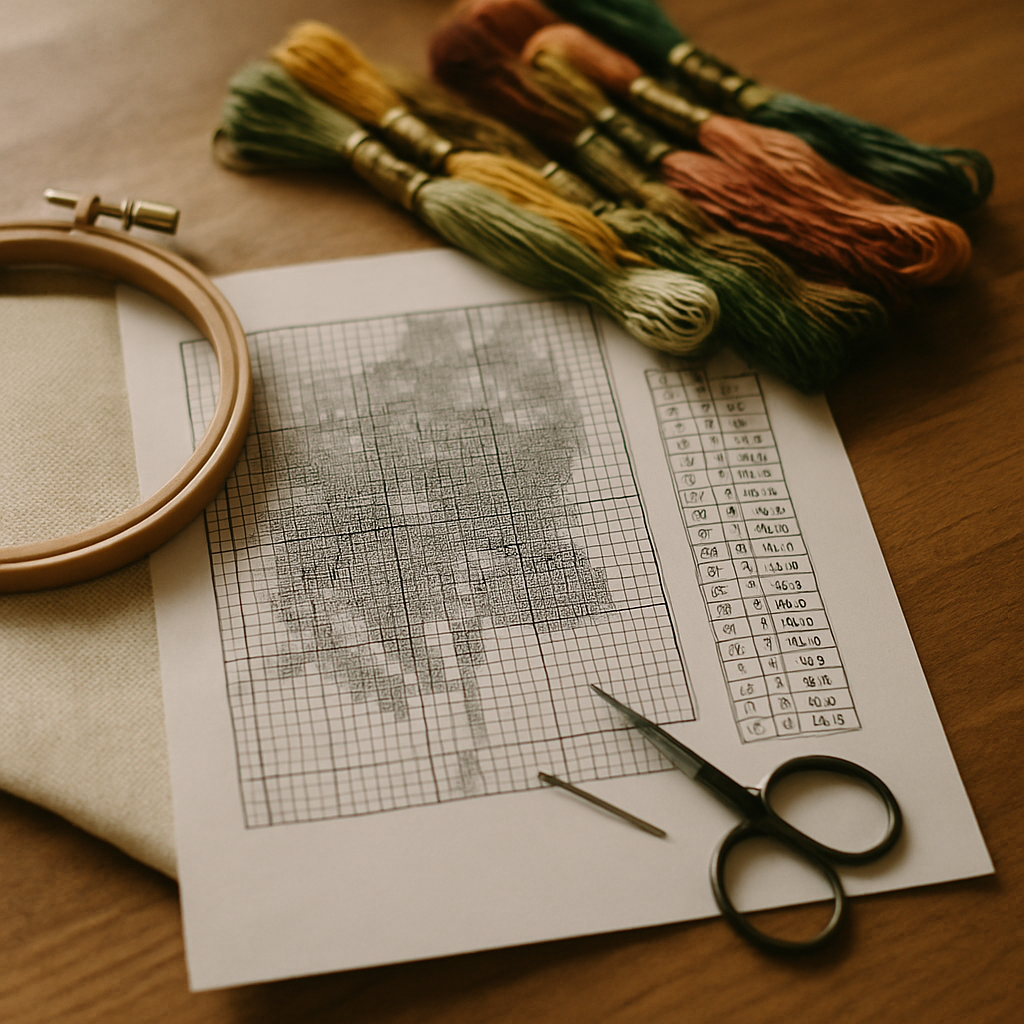
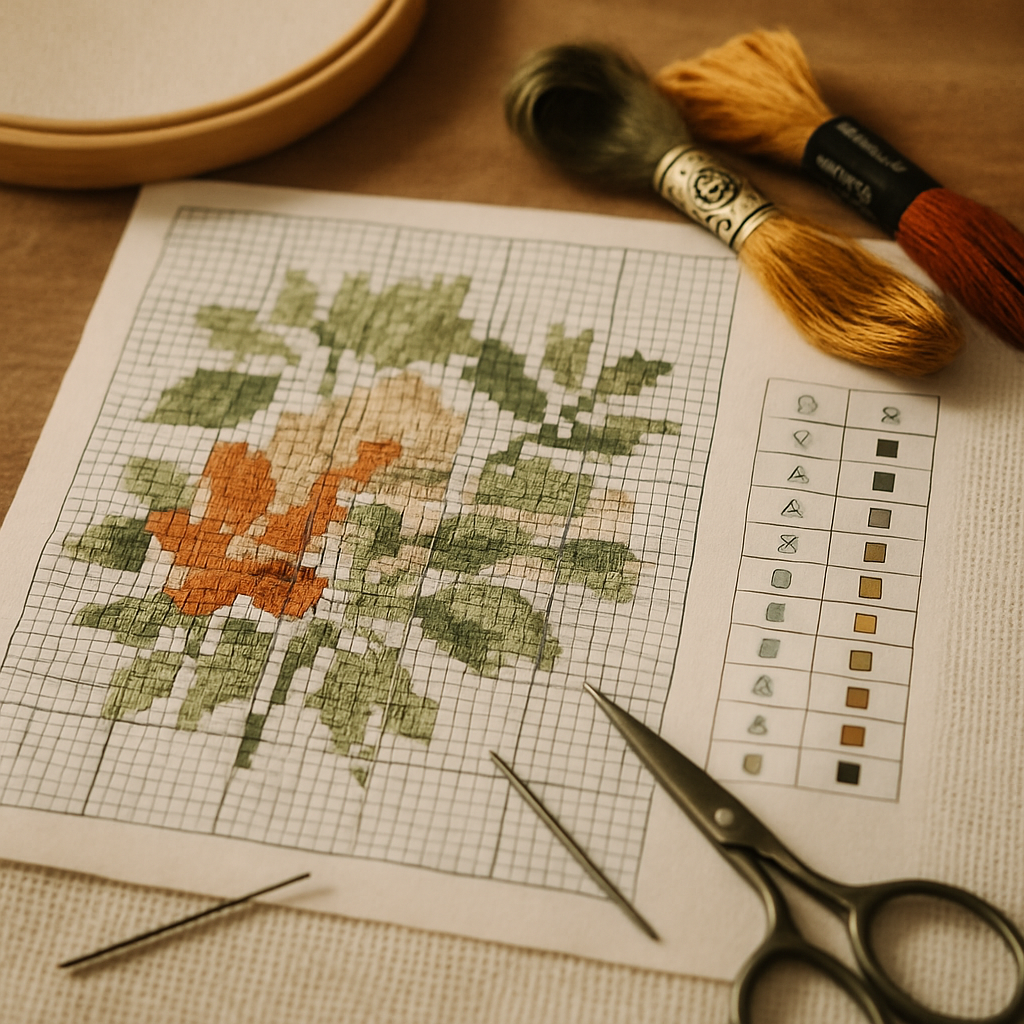
The chart. The big gridded area that takes up most of the page. Every small square represents one cross-stitch on your fabric. The chart is not a picture of the finished piece (though many modern patterns also include a colored preview elsewhere on the page). It's a map of which color goes where.
The legend (also called key or thread list). A column or table somewhere on the same page — usually to the right of or below the chart — that tells you which color goes with which symbol. Each row in the legend says something like "DMC 310 = ■" or "Anchor 403 = X."
Grid lines. The chart is divided into a fine grid (one square = one stitch), and a heavier grid (usually every 10 squares) helps you count. The 10-square grid is the single most useful tool for not losing your place.
Center markers. Almost every pattern has small arrows or triangle marks along the outer edge of the chart pointing at the row and column where the center of the design sits. Find both arrows, follow them to where they cross, and you've found the centre stitch — the conventional starting point for most patterns.
The thread list / floss list. Often the same as the legend, sometimes a separate block. It includes the brand and number of every floss color the pattern uses, plus how many skeins of each you'll need.
Stitch type indicators. Notes that distinguish regular cross-stitch from fractional stitches (quarter, half, three-quarter), backstitch (outlines), French knots, and any special stitches the pattern uses. These are usually marked in a separate legend section with their own symbols.
Header information. The pattern title, designer name, finished size in inches or centimetres, the recommended fabric count, and the total stitch count. Read this section before doing anything else — it tells you whether the pattern is right for your fabric.
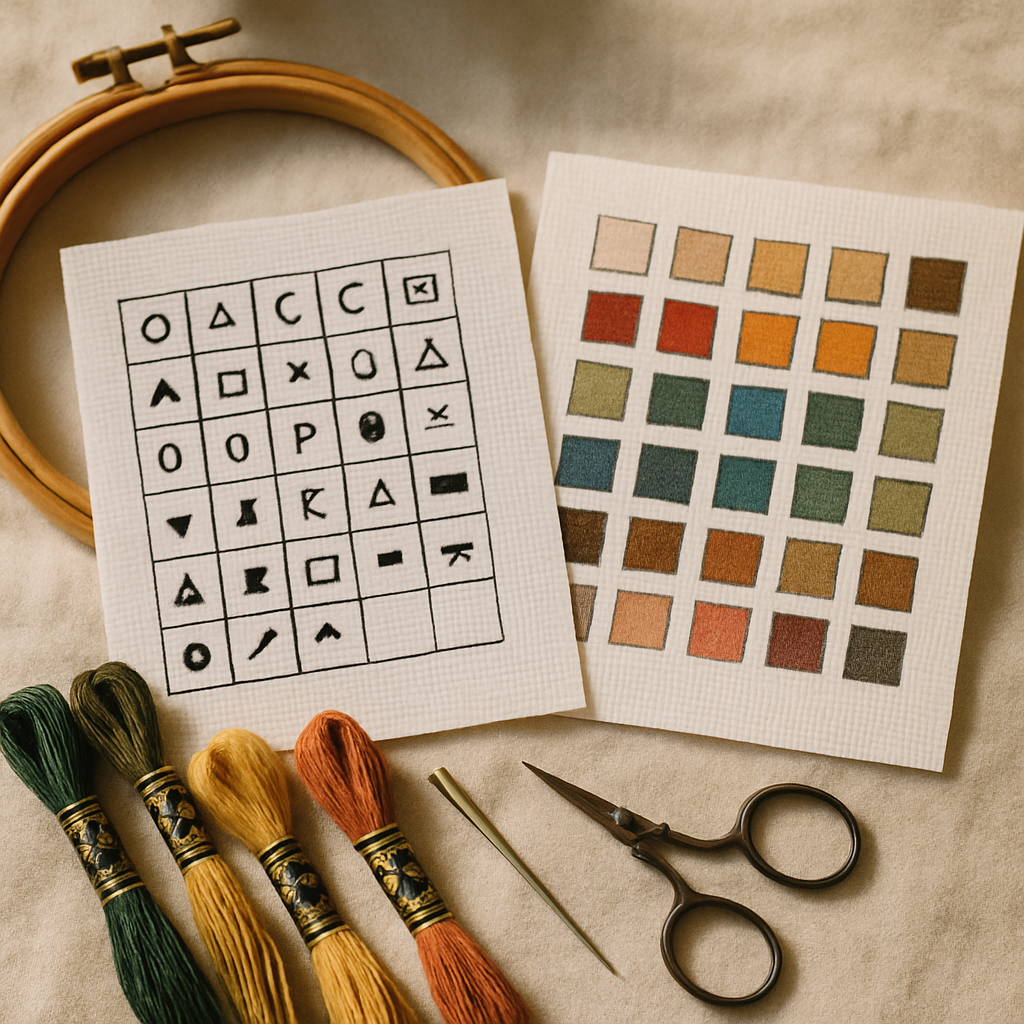
Symbol charts vs color-block charts
 Cross-stitch patterns come in two main visual styles, and beginners encounter both. They convey the same information differently, and there are practical reasons to prefer one or the other.
Symbol charts use abstract symbols (X, O, ●, ▲, *, ★, etc.) to represent each color. The whole chart is usually black and white, which makes them ink-friendly, printable, and easy to read in low light. You match a symbol to its color in the legend, then stitch.
Color-block charts use actual colored squares — the color you see in the chart is roughly the color of the floss you'll stitch with. Many modern patterns combine both: a colored square with the symbol overlaid on it, giving you redundancy in case the colors are subtle or the print is grayscale.
Most printed patterns lean toward symbol charts because color printing on large pattern sheets is expensive. Most digital patterns lean toward color-block (with symbols overlaid) because screens render color cheaply. Neither is "better" — the question is which you find easier to read.
The advantage of symbol charts: distinct symbols make adjacent colors easy to tell apart, even when the floss colors themselves are similar. The advantage of color-block charts: you can see the design's overall shape at a glance without consulting the legend.
For projects with subtle gradients — skin tones, landscapes — color-block charts make it harder to distinguish DMC 754 from DMC 945 by eye but symbol charts handle it fine because each color gets a unique symbol. For projects with bright, clearly distinct colors — folk-art designs, geometric patterns, holiday motifs — color-block charts are usually faster to stitch from because you don't need to keep flipping to the legend.
If you're choosing a pattern format, the symbol chart is usually the safer bet for beginners. Distinct shapes are harder to misread than subtle color differences.
Reading the legend (key / thread list)
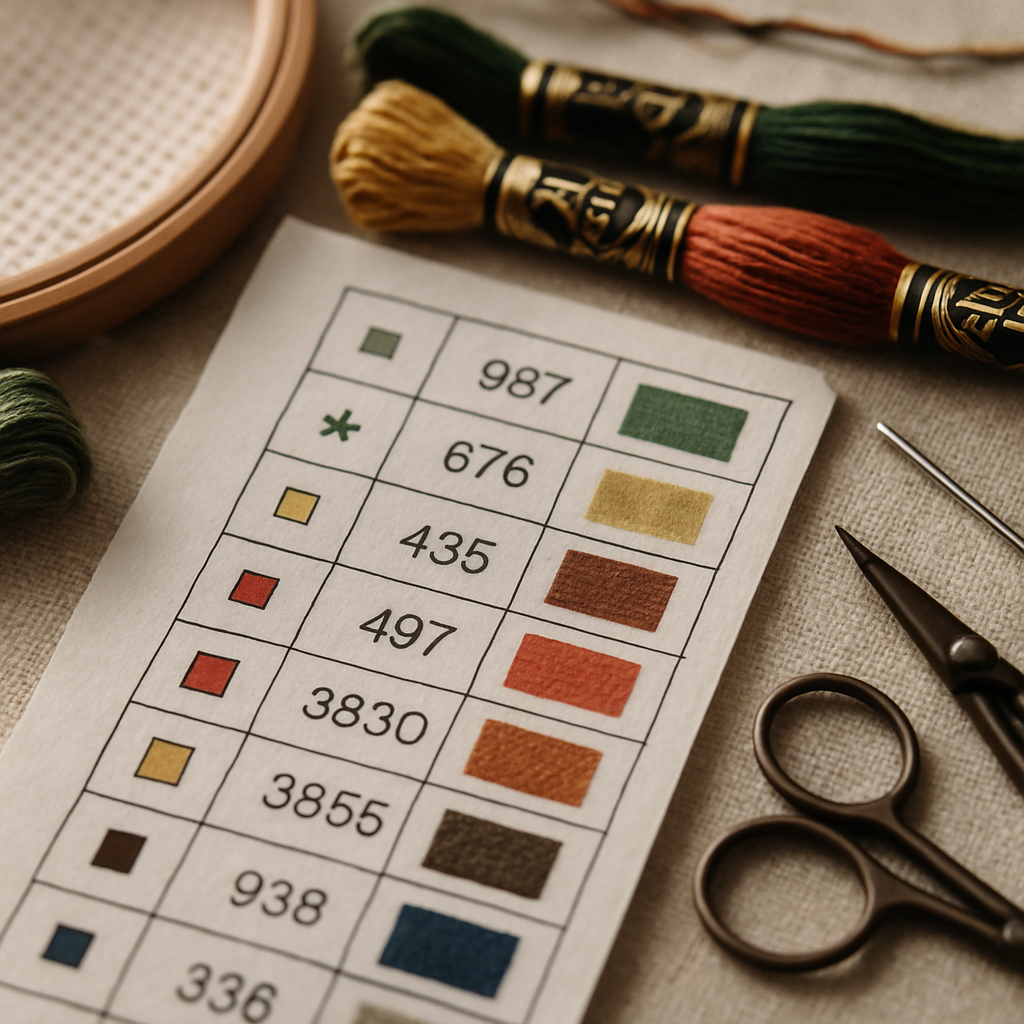 The legend is your dictionary. Every symbol on the chart has a row in the legend; every row tells you which color of floss to use. A typical legend row contains:
- The symbol as it appears on the chart
- The brand and color number (e.g.
DMC 321) - The color name (e.g.
Christmas Red) - Sometimes a swatch showing the color
- Sometimes the number of skeins required
Some patterns also indicate the strand count next to each color — for example, DMC 310 / 2 strands means use 2 strands of floss for those stitches. More commonly the strand count is given once for the whole pattern in the header information.
If your pattern uses a brand of floss that's not in your stash, you can convert codes using a conversion chart. Our DMC vs Anchor floss guide covers the most common conversions and the color families where substitution gets tricky. If you frequently end up with patterns in the "wrong" brand, you may also want to generate patterns in your preferred brand from the start — more on that below.
Knowing what you already own
A practical step before you buy a single skein: compare the legend against what's already in your floss drawer. New stitchers often start with no stash and buy every color the pattern calls for — fine for project one. By project three you've accumulated 40 or 50 colors and the next pattern's shopping list shouldn't be "every color, again." It should be "the few colors I'm missing."
This is what a digital floss stash tracker is for. StitchThis includes one that lets you record which colors and skein counts you own, then matches that inventory against any pattern's legend to highlight what you still need to buy. The two friction-killing parts: you can upload a CSV of your stash if you already maintain a spreadsheet (paste it in, the tracker imports the rows), or upload a photo of your floss skeins laid out in their organizer and the tracker identifies the brand and color codes for you. Manual entry of 200 colors is what kills adoption of every digital stash tool — bringing in your stash from a spreadsheet or a single photograph is the difference between "I'll use this" and "I'll never get around to using this."
Once your stash is in, every pattern you generate or import shows you exactly which colors are already in your drawer and which you'll need to buy. For a more detailed look at planning floss purchases against the size of a project, see (forthcoming) how much floss do I need for my cross-stitch pattern.
How many strands of floss to use
Cross-stitch floss comes as a six-strand skein. You almost never stitch with all six strands at once; you separate the floss into smaller groups and stitch with those.
The general rule for cross-stitch on Aida fabric:
- 14 count Aida: 2 strands for the cross-stitches, 1 strand for backstitch
- 16 count Aida: 2 strands for cross-stitches, 1 strand for backstitch
- 18 count Aida: 1 or 2 strands for cross-stitches (2 gives better coverage but tighter holes), 1 strand for backstitch
The pattern's header should specify the recommended strand count. If it doesn't, default to 2 strands for cross-stitches and 1 for backstitch and adjust from there based on coverage. Sparse coverage (white fabric showing through) means you need another strand; the stitches looking bulky and crowded means drop one.
Choice of fabric count interacts with this. For a complete breakdown of how 14, 16, and 18 count Aida differ in finished size, detail, and difficulty, see Aida 14 vs 16 vs 18: The Complete Cross-Stitch Fabric Count Guide.
Where to start stitching — center vs corner debate
Almost every pattern recommends starting from the center. There's a reason: starting from the center guarantees the finished piece will be centered on your fabric, so you don't reach the bottom and realize the design is two inches off-axis.
To start from the center:
- Find the center of your fabric. Fold the fabric in half lengthwise, then in half again widthwise. The point where both folds cross is the center.
- Find the center of the pattern. Follow the arrow markers on the outer edges of the chart — both arrows point at row and column where the center stitch lives.
- Place your first stitch there. Match the fabric center to the chart center and place a single cross-stitch in the color shown.
From that anchor stitch you work outward, one symbol at a time, following the chart.
The corner-first approach has its defenders. The argument is that beginning at the top-left corner means you're always counting from a known reference point (the edge of the design), so a counting error costs you less. The counter-argument is that if you've miscounted the size of the design or your fabric isn't quite the right shape, you end up with the finished piece pushed to one side.
For your first project, center-first is the safer choice. Once you've stitched a few pieces and have a feel for the count, you can experiment.
Counting and keeping your place
The single biggest beginner problem is losing count. You stitch four red squares to the right, then look up at the chart, lose your spot, count again, count again differently, and now you're not sure if the next stitch should be red or pink.
A few approaches that work:
Use the 10-square grid. The bold lines on the chart aren't decorative — they're navigation aid. Count by tens, not by individual squares. "Five tens plus three" is much harder to mess up than "fifty-three."
Mark progress on the pattern. Print the chart and cross out each square as you stitch it. A highlighter works well because you can still see the symbol underneath if you need to double-check. For digital patterns, an in-browser tracker that lets you tap each cell as you complete it solves this entirely.
Work in small chunks. Don't try to stitch a whole row at once. Pick a small region — a 10×10 grid block, a single color area — finish it, verify against the chart, move on.
Use a parking technique for complex patterns. When you're stitching multiple colors in the same small area, leave your needle dangling with the thread visible above the fabric in the next square it'll be used in. This is called parking and it saves enormous time on patterns where you'd otherwise be threading and un-threading needles constantly.
Avoid stitching from a folded chart. Cross-stitch patterns are often distributed across multiple pages with overlap. Tape the pages together or work from a single combined image. Trying to mentally bridge the page break is where most counting errors happen.
If you're working from a pattern viewed on a phone or tablet, the screen's stitch tracker can do all of the counting and progress-marking for you — tap each stitch as you complete it, and your place is saved between sessions.
Reading backstitch (the outlines)
Most patterns include backstitch in addition to regular cross-stitches. Backstitches are the dark outline strokes that define edges — the outline of a leaf, the curve of a letter, the eyes of a portrait. On the chart, backstitch is drawn as solid colored lines rather than symbols in squares.
You stitch the cross-stitches first, then add the backstitch on top. Backstitch always uses fewer strands than cross-stitch (usually 1 strand, sometimes 2 for emphasis on heavy lines). The legend will indicate which color and strand count the backstitch uses, often with a note like "Backstitch: DMC 310, 1 strand."
A backstitch line on the chart that runs along the edge of a square means the backstitch goes along the corresponding edge of that fabric square. A line that runs diagonally across a square means a diagonal backstitch over that square. Long backstitch lines on the chart are still made up of individual stitches end-to-end on the fabric — you don't make one long stitch, you make a series of short stitches that follow the chart line.
The backstitch is what makes a finished piece "pop." It's tempting to skip when you're tired of stitching, but the difference between a piece with and without its backstitch is huge.
Reading fractional stitches (the angled ones)
Beyond the regular X-shaped cross-stitch, some patterns include fractional stitches — partial stitches that take up only part of a square. They're how designers achieve detail and smooth diagonal edges that whole stitches alone can't render.
Quarter stitch — one-quarter of a cross-stitch (just one diagonal slash filling a corner of a square). The legend symbol is often a triangle or wedge in one corner of the square it occupies.
Half stitch — one of the two diagonals of a cross-stitch. Often used as a softer fill, especially in backgrounds. The symbol is usually a single diagonal slash.
Three-quarter stitch — a half stitch plus a quarter stitch in the same square. Looks like a regular cross-stitch with one of the four arms missing. Used to soften the staircase effect on diagonal edges.
A pattern that uses fractional stitches will have a separate part of the legend explaining the notation. Patterns intended for beginners often skip fractionals entirely; patterns for portrait work or fine detail use them extensively. If you're a complete beginner and your first pattern is dense with quarter and three-quarter stitches, the pattern was not designed with beginners in mind — pick something simpler for your first project.
Special stitches: French knots, beads, blends
A few less-common notations crop up in more advanced patterns:
- French knots — small raised bumps used for eyes, dots, and small accents. Usually marked with a filled-circle symbol with a note in the legend specifying "French knot."
- Beads — actual beads sewn onto the fabric rather than stitched. Marked with a circle symbol and a bead color code in the legend.
- Blends — two strands of one color blended with one strand of another to create an intermediate shade. Marked in the legend with both colors and a strand-count notation like "DMC 712 + DMC 822 (1+1 strand)."
- Specialty stitches — herringbone, satin, lazy daisy, and others appear in samplers and decorative pieces. The pattern will include a dedicated key explaining each one.
If your pattern uses anything other than regular cross-stitch and backstitch, take a minute to read the special-stitch section of the legend before you start. Misinterpreting a French knot as a regular stitch in the middle of a project means picking out work.
Why some patterns are harder to read than others
Two beginners with identical experience can have wildly different first-project outcomes depending on which pattern they pick. It's not just about size or color count — pattern design quality matters as much as pattern complexity.
Common signs that a pattern is going to be harder to read than its colorful preview suggests:
- Heavy confetti — single isolated stitches of one color scattered through an area of another color. Hard to count, hard to keep track of, easy to skip.
- Adjacent similar colors with similar symbols — when two pinks in the same area use circles that differ only slightly, your eye blurs them mid-stitch.
- Excessive fractional stitches in tight areas — patterns that lean on quarter-stitches to render detail can feel impossible to keep straight.
- Tiny grid printing — patterns printed at sub-readable scales force constant zooming and chart re-reading.
- Disorganized legends — legends sorted by symbol shape rather than by color value mean you can't quickly find the next color in a gradient.
For a deeper look at what makes some patterns frustrating despite looking great on paper, The Designer's Guide to Pattern Testing covers the failure modes that distinguish well-tested patterns from poorly-tested ones.
For your first projects, look for patterns that minimize these issues: lower color counts, distinct symbols, no fractionals (or very few), readable print scale, and a clean legend organized by color family.
When you're ready for a pattern, what to look for
If you're shopping for your first pattern (or your fifth), a few practical filters will save you from the frustrations above:
- Stitch count under 10,000 for a first project. That's a small motif piece, finishable in a few weekends rather than a few months.
- Color count under 12. Each new color is another floss skein, another row in the legend, another chance to mis-thread.
- No fractional stitches for absolute beginners. Save those for project two or three.
- Color-block chart available if you struggle with symbols, or symbol chart if you struggle with similar colors.
- Legend organized by color family (lights to darks within each hue) rather than alphabetically or by symbol.
- Clean, generous print scale if working from paper. At least 14 squares per inch is comfortable.
Free patterns are abundant — many designers offer beginner-friendly pieces as introductions to their paid catalogs. The challenge is finding ones built specifically for first projects.
You can also create your own. Modern pattern-creation tools let you upload a photo and generate a beginner-appropriate pattern from it — choosing a low color count, a manageable stitch count, and a brand from your existing stash. The pattern's legend, symbols, and grid scale are all set up correctly from the start, so the first pattern you read is one designed to be readable.
StitchThis generates patterns from photos with brand-matched legends (DMC, Anchor, Cosmo, Gamma, Madeira, or Metro), clean symbol assignment, and a built-in viewer with a stitch tracker — tap each square as you complete it, the count handles itself. Two patterns per month on the free tier, no card needed. If you want your first project to be a photo of your dog, your grandmother's house, or anything that matters to you, making patterns from your own photos is a clean way in.
FAQ
How do I find the center of my fabric? Fold the fabric in half along its length, then in half along its width. The point where the two folds intersect is the center. Mark it with a removable fabric pen or a single tacking stitch, then unfold.
What does DMC mean on a cross-stitch pattern? DMC is the most common floss brand worldwide — short for "Dollfus-Mieg & Compagnie." When a pattern says "DMC 310," it means use color number 310 from the DMC range (which is black). Most patterns published outside the UK default to DMC numbers. Anchor is the second most common brand. See our DMC vs Anchor guide for a full conversion chart.
How do I read a cross-stitch pattern without losing my place? Use the bold grid lines on the chart as navigation markers, count by tens rather than ones, and physically mark off completed squares on a printed chart with a highlighter. For digital patterns, an in-browser tracker that lets you tap each completed stitch handles this automatically.
Should I start in the center or the corner? For your first few projects, start in the center. It guarantees the finished design is centered on the fabric and gives you a known reference point. Corner-first is fine once you've stitched enough pieces to be confident in your count.
What if my pattern doesn't have a legend? A pattern without a legend is incomplete — the chart alone doesn't tell you which color matches which symbol. If you've received a pattern with no legend, contact the designer. If you generated the pattern yourself, regenerate or re-export with the legend included.
How long does it take to read a cross-stitch pattern fluently? After two or three completed pieces, the chart-to-fabric translation becomes automatic. By project five, you'll be glancing at the chart and stitching without consciously decoding each symbol. The first project takes the longest because you're learning the conventions while also learning the craft.
Can I make my own cross-stitch patterns? Yes — modern tools let you generate a pattern from a photo in a few minutes, with the brand, fabric count, stitch count, and color count all configurable. See free cross-stitch patterns from your own photos for the full walkthrough, and the Mac pattern maker guide if you're on macOS and worried about software compatibility (the answer: browser-based tools work everywhere).
What if my pattern uses Anchor but I only have DMC? You can substitute using a conversion chart, but be aware that not every conversion is exact. The DMC vs Anchor floss guide covers the most common conversions plus the color families where substitution shifts noticeably.
You can start
Most of the panic about "I can't read this pattern" comes from looking at the whole chart at once. The trick is to stop doing that. Look at one square. Find its symbol. Look that symbol up in the legend. Stitch that one square in the color the legend specifies. Look at the next square. Repeat. The whole pattern is just that, ten thousand times — but you only ever look at one square at a time.
By the time you finish your first piece, the chart will have stopped looking like a war map. It will look like a road, and you'll be walking along it.
Your first project doesn't need to be ambitious. Pick something small, with bold distinct colors, a low color count, no fractional stitches, and a generous grid scale. A beginner-friendly small motif piece — a bird, a flower, a single letter — is the right scale for project one.
If you want to start with a pattern of a photo that matters to you instead of a generic beginner motif, you can try StitchThis free — upload an image, pick a brand, get a pattern in a few minutes with the legend, symbols, and stitch tracker all set up for you. Two patterns per month, no card. Your first finished piece doesn't have to be a stock design.
Related reading on StitchThis:
- DMC vs Anchor Floss: Conversion Chart, Quality Comparison, and Pro Tips — when your pattern is in the "wrong" brand for your stash.
- Cross-Stitch Aida 14 vs 16 vs 18: The Complete Fabric Count Guide — choose the right fabric count for your first project.
- Free Cross-Stitch Patterns from Your Own Photos — make a beginner-friendly pattern from a photo you care about.
- Cross-Stitch Pattern Maker for Mac (Definitive Guide) — browser-based pattern creation that works on every platform.
- The Designer's Guide to Pattern Testing — why some patterns are easier to read than others.
- Pet Memorial Cross-Stitch Pattern Guide — when you're ready for a high-stakes project.
- How to Photograph Your Pet for a Cross-Stitch Pattern — preparing source photos for portrait projects.
Ready to turn your photo into a cross-stitch pattern?
Try StitchThis freeTwo patterns per month. No card required.